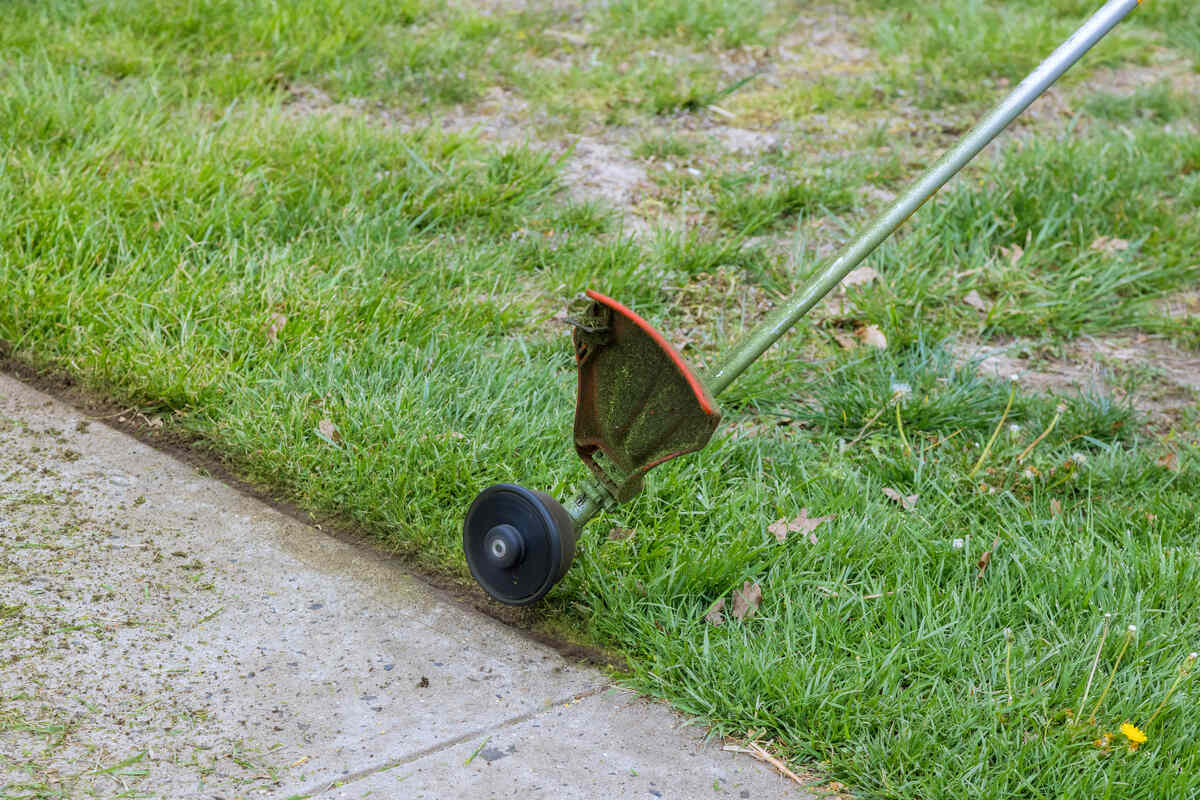
To edge with a weed eater, rotate the trimmer so the cutting string moves vertically, guide the tool slowly along the lawn border, and maintain a steady angle to create a clean line between grass and hard surfaces.
In many U.S. homes, maintaining a neat lawn edge along driveways, sidewalks, and garden beds is part of regular yard care. Homeowners often use a weed eater, also called a string trimmer, because it can create defined borders without needing a separate dedicated lawn edger.
Edging with a weed eater requires more than simply cutting grass near a sidewalk. The correct technique involves adjusting the tool position, controlling the cutting direction, protecting nearby surfaces, and making small corrections as you move. When done properly, a string trimmer can produce a sharp-looking lawn edge while also removing overgrown grass that spreads into unwanted areas.
Edging with a weed eater means using a string trimmer to cut grass that grows beyond the desired lawn boundary. Instead of cutting horizontally like normal trimming, the tool is positioned so the spinning string cuts vertically along the edge.
This technique is commonly used around sidewalks, driveways, patios, fences, and landscape beds where grass tends to spread beyond the intended lawn area. A weed eater does not create a physical trench like some dedicated edgers, but it can produce a clean visual separation when used correctly.
Source: i.ytimg.com
Weed eater
A handheld outdoor power tool that uses rotating nylon string to cut grass and weeds.
Edging
The process of creating a defined border between lawn areas and hard surfaces or planting areas.
Can Any Weed Eater Be Used for Edging?
Most string trimmers can perform basic edging if the cutting head can be rotated or tilted into a vertical cutting position. Some models include a built-in edging guide or adjustable shaft, while others require the user to manually position the tool.
Adjustable design
Models with rotating heads or adjustable handles usually make edging easier.
Power source
Battery, electric, and gas-powered trimmers can all edge, although runtime and power vary by model.
How to Edge With a Weed Eater Step by Step
The basic process involves preparing the area, changing the cutting position, and moving steadily along the edge. Taking time during the first pass helps prevent uneven lines or accidental damage to sidewalks and landscaping.
Source: lawnlove.com
1. Prepare the area
Remove sticks, rocks, and other debris near the edging line because the spinning string can throw loose objects.
2. Wear protective equipment
Use safety glasses, closed-toe shoes, and hearing protection when appropriate to reduce exposure to flying debris and noise.
3. Position the weed eater vertically
Turn the cutting head so the string rotates vertically against the grass edge instead of cutting flat across the lawn.
4. Follow the existing border
Walk slowly along the sidewalk, driveway, or garden bed while keeping the cutting line consistent.
5. Clean up remaining grass
Use a blower or rake to remove clippings and reveal the finished edge.
Hold the weed eater with both hands and keep the cutting head slightly away from your body. The string should contact the grass edge while avoiding unnecessary contact with concrete, wood, or decorative surfaces.
Maintain a comfortable posture and avoid twisting your wrists excessively. A stable grip allows better control and produces a straighter edge.
Correct angle
The cutting string should be vertical enough to trim the edge rather than the top of the grass.
Steady movement
Slow movement generally creates a cleaner result than aggressive cutting.
Tips for Creating a Cleaner Lawn Edge
A professional-looking edge usually comes from consistency rather than cutting deeper or faster. Small adjustments in technique can improve the appearance of your lawn border.
Source: thedailygardener.com
Keep a consistent path
Follow the existing border line instead of making frequent changes in direction.
Avoid cutting too deeply
Removing excessive soil can damage the lawn edge and create unnecessary gaps.
Trim regularly
Frequent light edging is usually easier than correcting heavily overgrown borders.
Maintain the string
A properly extended cutting string improves cutting performance and reduces uneven results.
Edging Along Sidewalks and Driveways
Concrete surfaces make useful guides because they provide a straight reference line. Keep the trimmer close enough to remove grass growing over the pavement but avoid excessive contact with the hard surface, which can wear down the string quickly.
Best approach
Use the sidewalk or driveway edge as a visual guide and make smooth passes.
Common Weed Eater Edging Problems and Solutions
Uneven edges usually result from incorrect tool position, poor visibility, or moving too quickly. Identifying the cause makes it easier to correct the problem.
Source: lawnstarter.com
Problem: The edge looks uneven
Cause: The trimmer angle or walking speed changes frequently. Solution: Slow down and maintain a consistent vertical position.
Problem: Grass remains on the sidewalk
Cause: The cutting string is not reaching the overgrown area. Solution: Adjust your position and make another controlled pass.
Problem: String wears out quickly
Cause: Excessive contact with concrete or hard surfaces. Solution: Let the string cut grass instead of grinding against pavement.
Problem: The trimmer kicks up debris
Cause: Loose objects or incorrect cutting direction. Solution: Clear the area first and wear proper protection.
A weed eater is useful for routine lawn maintenance, but it may not replace a dedicated lawn edger in every situation. Dedicated edgers are designed specifically to create deeper, more defined borders and may perform better for homeowners who maintain formal landscapes.
For areas with thick roots, heavily overgrown grass, or neglected borders, additional tools may be needed before regular weed eater edging can maintain the line.
Source: i.ytimg.com
Use a dedicated edger when
You need a deep, sharply defined border that stays visible longer.
Use a weed eater when
You need flexible trimming around mixed lawn areas, beds, fences, and existing edges.
Frequently Asked Questions
Q
Can I use a weed eater instead of an edger?
Yes. A weed eater can create clean lawn borders by changing the cutting head position and using controlled movements. However, it may not create the same depth as a dedicated edging tool.
Q
Should the weed eater blade or string be vertical when edging?
The cutting string should be positioned vertically for edging. This allows the string to cut along the lawn boundary instead of trimming the top surface of the grass.
Q
How often should I edge my lawn with a weed eater?
The frequency depends on grass growth, weather, and lawn maintenance habits. Many homeowners edge when grass begins spreading over sidewalks, driveways, or garden borders.
Q
Why does my weed eater leave a messy edge?
A messy edge can result from moving too quickly, using the wrong angle, or cutting unevenly. Slowing down and maintaining a consistent position usually improves results.
Q
Is edging with a weed eater safe?
Edging can be safe when the operator follows basic precautions, including wearing eye protection, clearing debris, and keeping other people and pets away from the work area.
✦ Wrapping Up
Conclusion
Learning how to edge with a weed eater is mainly about controlling the tool rather than using extra force. By rotating the cutting head vertically, following the lawn boundary, and maintaining a steady pace, homeowners can create cleaner edges around common yard areas.
The best results come from regular maintenance, proper safety practices, and understanding when a string trimmer is suitable and when a dedicated edger may be a better option.
💡 Key Takeaway
Start with a slow first pass along your sidewalk or driveway edge, keep the trimmer vertical, and make small adjustments until you achieve a consistent lawn border.
There’s nothing more frustrating than pulling your mower cord and hearing… nothing. You tug again, a little harder this time, and suddenly the rope snaps back—or worse, breaks completely. Now, instead of mowing your yard, you’re stuck diagnosing a new problem. The truth is, lawn mower starter cord replacement is one of those maintenance tasks…
When you’re ready to mow your lawn and your lawn mower blades are not engaging, it can be one of the most frustrating moments of the week. You’ve planned your afternoon, the sun’s shining, the grass is tall, and then—nothing. The engine roars, but the blades refuse to spin. That feeling of confusion is universal…
Nothing ruins a sunny weekend faster than when your lawn mower starts but does not stay running. You pull the cord, the engine fires up, you think it’s ready—then it coughs, sputters, and dies. It’s frustrating, especially when your grass looks like a mini jungle and all you want is a clean, even cut. The…