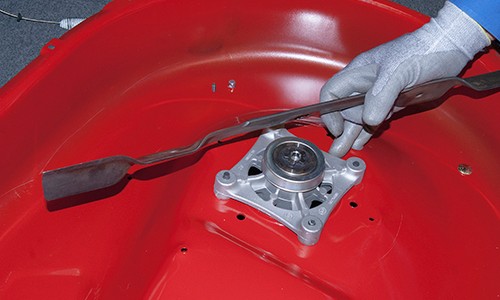
To install riding mower blades, park the mower safely, disconnect the power source, remove the old blades, install the new blades with the cutting edge facing the correct direction, tighten the blade bolts to the manufacturer’s specification, and verify that the blades rotate correctly before mowing.
Across American lawns, riding mowers are commonly used to maintain large residential yards, especially during the growing season in regions where grass requires regular cutting. A dull, damaged, or incorrectly installed mower blade can reduce cutting quality, leave uneven grass, and place unnecessary strain on the mower deck. Installing replacement blades correctly helps restore mowing performance and supports safer operation.
Replacing riding mower blades is a practical maintenance task that many homeowners can complete with basic tools and careful preparation. The exact blade removal process varies by mower brand and deck design, so owners should always check the operator’s manual for the correct blade type, bolt specifications, and safety instructions before starting the job.
What You Need Before Installing Riding Mower Blades
Before beginning the installation, gather the correct tools and replacement parts. Preparation reduces the chance of damaging the mower or installing the blade incorrectly.
Most riding mower blade replacements require lifting access to the mower deck, removing the blade mounting bolt, and securing the new blade in the same position as the original. Because different mower models use different blade systems, confirm compatibility before purchasing a replacement blade.
Source: i.ytimg.com
Replacement blades
Use blades that match your riding mower brand, model number, deck size, and mounting style.
Basic tools
Common tools include a socket wrench, correct-size socket, gloves, safety glasses, and a block or blade removal tool to prevent movement.
Safety equipment
Wear protective gloves and eye protection because mower blades have sharp edges and may contain grass buildup or debris.
How to Choose the Correct Riding Mower Blade
The correct blade depends on the mower deck design and cutting system. A blade that fits physically may still be unsuitable if the mounting hole pattern, length, or cutting style does not match the mower requirements.
Check mower information
Use the model number from the mower frame or owner’s manual to identify compatible blades.
Match blade type
Standard blades, mulching blades, and high-lift blades are designed for different mowing results and grass conditions.
Step-by-Step: How to Install Riding Mower Blades
Installing riding mower blades involves removing the existing blade, positioning the replacement correctly, and securing it firmly. Follow these steps carefully to avoid incorrect installation.
Source: i.ytimg.com
Step 1: Park and prepare the mower
Park the mower on a flat surface, turn off the engine, remove the ignition key, engage the parking brake, and allow hot components to cool.
Step 2: Disconnect the power source
Disconnect the spark plug wire on gasoline-powered mowers or follow the manufacturer’s shutdown procedure for electric riding mowers.
Step 3: Access the mower deck
Raise the mower safely according to the owner’s manual or remove the deck if required by the design.
Step 4: Remove the old blade
Secure the blade so it cannot turn, then loosen and remove the blade mounting bolt using the correct socket.
Step 5: Install the new blade
Place the new blade on the spindle with the cutting edge facing the direction of rotation and the raised section positioned correctly.
Step 6: Tighten the blade bolt
Install and tighten the mounting hardware according to the mower manufacturer’s recommended torque specification.
The cutting edge of the blade should face the direction the blade rotates during operation. The raised curved portion of many mower blades usually faces upward toward the mower deck. Installing a blade upside down can prevent proper cutting and may create unsafe operating conditions.
Look for the cutting edge
The sharp edge is the part designed to cut grass and should face the correct rotation direction.
Check blade markings
Some blades include labels such as ‘bottom,’ ‘grass side,’ or directional indicators to assist installation.
How to Confirm the Blade Installation Was Successful
After installing the blades, perform a careful inspection before mowing. A correctly installed blade should be secure, properly positioned, and free from unusual movement.
A short test run without engaging the cutting deck can help confirm that the mower operates normally before cutting grass.
Source: images.ctfassets.net
Check blade security
The blade should not wobble, shift, or move independently from the spindle.
Inspect blade direction
Confirm the cutting edge and blade orientation match the original installation position.
Test mowing quality
After installation, look for even cutting and normal mower operation.
Signs the Blade May Be Installed Incorrectly
Incorrect installation can cause poor cutting performance or unusual mower behavior. Stop operation and inspect the installation if problems appear.
Uneven grass cutting
A reversed or incorrect blade position can prevent the mower from cutting grass effectively.
Excessive vibration
Vibration may indicate an unbalanced blade, loose hardware, or improper installation.
Common Mistakes When Installing Riding Mower Blades
Most blade installation problems happen because of incorrect blade orientation, loose hardware, or failure to follow mower-specific instructions. Avoiding these mistakes improves both mowing results and equipment reliability.
Source: i.ytimg.com
Installing blades upside down
A reversed blade can reduce cutting performance and may affect airflow under the deck.
Using the wrong blade model
A blade that does not match the mower can create fitment problems or unsafe operating conditions.
Failing to secure the blade
Loose mounting bolts can allow blade movement and may damage mower components.
Professional assistance may be appropriate if the blade bolt is damaged, the spindle is worn, the deck has structural problems, or the mower continues vibrating after blade replacement.
Damaged mounting parts
Replace damaged bolts, washers, or spindle components instead of reinstalling unsafe parts.
Riding Mower Blade Installation Tips for Better Results
Proper blade installation is only one part of maintaining a riding mower. Regular inspections help identify worn blades before they affect mowing performance.
Source: i.ytimg.com
Inspect blades regularly
Check for cracks, bends, excessive wear, and damaged cutting edges during routine maintenance.
Keep blades balanced
An unbalanced blade can contribute to vibration and uneven cutting.
Blade replacement timing depends on mowing frequency, lawn conditions, obstacles encountered, and blade wear. Homeowners should replace blades when sharpening can no longer restore a safe cutting edge or when damage is present.
Heavy mowing conditions
Large yards, rough terrain, and frequent mowing may require more frequent blade inspections.
Frequently Asked Questions
Q
Can I install riding mower blades myself?
Yes, many homeowners can install riding mower blades themselves if they follow safety procedures, use the correct tools, and install the replacement blades according to the mower manufacturer’s instructions.
Q
Which side of a riding mower blade faces down?
The cutting edge should face downward toward the grass, while the raised portion of the blade typically faces upward toward the mower deck. Always verify with the mower manual because designs vary.
Q
Do riding mower blades need to be balanced after installation?
Yes, a balanced blade helps reduce vibration and supports smoother mower operation. Check balance whenever installing new or sharpened blades.
Q
Why does my riding mower vibrate after changing blades?
Common causes include an unbalanced blade, loose mounting hardware, incorrect blade installation, or damaged spindle components.
Q
Should I remove the mower deck to install blades?
Some riding mower models allow blade replacement with the deck installed, while others require deck removal. Follow the instructions for your specific mower model.
✦ Wrapping Up
Conclusion
Installing riding mower blades is a manageable maintenance task when performed carefully. The most important steps are choosing the correct blade, disconnecting power, installing the blade in the proper orientation, and securing the hardware correctly.
Regular blade inspections and proper installation help maintain a cleaner cut, reduce mower stress, and keep your riding mower operating effectively throughout the mowing season.
💡 Key Takeaway
Before installing a new riding mower blade, confirm the correct replacement part, follow your mower manual, and prioritize safety at every step.
A replacement deck for lawn mower can completely transform how your mower performs. When a mower’s deck rusts, bends, or wears out, mowing becomes uneven and frustrating. Grass clumps up, blades vibrate, and the engine works harder than it should. Instead of struggling through another summer with poor performance, replacing the deck gives your mower…
When your Craftsman lawn mower begins to struggle at startup, crank sluggishly, or die after a few short runs, it’s often a sign that your battery has reached the end of its life. The heart of every electric-start mower lies in its power source — and choosing the right Craftsman Lawn Mower Replacement Battery makes…
There’s nothing more frustrating than pulling your mower cord and hearing… nothing. You tug again, a little harder this time, and suddenly the rope snaps back—or worse, breaks completely. Now, instead of mowing your yard, you’re stuck diagnosing a new problem. The truth is, lawn mower starter cord replacement is one of those maintenance tasks…
Can you use old gas in a lawn mower? Learn how gasoline age affects mower performance, when old fuel is still usable, how to fix bad gas problems, and when to replace it.