


When your Craftsman lawn mower auto choke not working becomes a recurring headache, mowing can turn into a frustrating guessing game. One moment your mower runs fine; the next, it sputters, stalls, or refuses to start unless you constantly fiddle with the throttle. If that sounds familiar, you’re not alone. Auto choke problems are among the most common issues faced by Craftsman owners—especially after winter storage or long periods of inactivity.
In this in-depth guide, we’ll explore what the auto choke system really does, why it fails, and how you can fix it yourself using simple tools and a little patience. By the end, you’ll know exactly how to restore smooth starts, consistent idle, and powerful mowing performance—without unnecessary mechanic bills or guesswork.
Understanding the Craftsman Auto Choke System
Before diving into repairs, let’s simplify what the auto choke actually does. Think of the choke as the “cold start assistant” for your mower’s engine. When the engine is cold, it needs a richer fuel mixture (more fuel, less air) to ignite properly. The auto choke system automatically closes the choke plate inside the carburetor when cold, limiting air flow and helping the engine start quickly.
As the engine warms up, a bi-metal spring or thermostat gradually opens the choke plate to allow more air in. This keeps the mixture balanced and prevents flooding or stalling.
However, when your Craftsman lawn mower auto choke not working, that delicate balance breaks. The engine may crank endlessly, start but die out, or surge erratically. These symptoms usually mean one or more of the following components aren’t doing their job:
- Choke plate or linkage is stuck due to carbon or varnish buildup.
- The choke spring or thermostat is broken or weak.
- Carburetor passages are dirty, leading to air/fuel imbalance.
- Vacuum leaks or damaged gaskets cause lean running.
- The heat source that activates the choke spring isn’t transferring heat.
Understanding how these parts work together gives you a clearer picture of what to inspect first.
Why the Craftsman Auto Choke Stops Working
There’s rarely one single cause. Most choke failures develop gradually from small issues that accumulate over time. If your mower worked fine last summer but struggles now, it’s likely a combination of old fuel, sticky linkages, or minor corrosion.
Here are some of the most common reasons your Craftsman lawn mower auto choke not working properly:
- Sticky Choke Plate: When fuel evaporates during storage, it leaves behind sticky varnish on the choke shaft and plate edges, preventing movement.
- Bent or Disconnected Linkage: The thin metal rods connecting the choke plate to the thermostat can easily get bent or disconnected during maintenance.
- Weak or Broken Choke Return Spring: The return spring ensures the choke plate opens and closes at the right time. If it’s stretched or broken, it throws everything off balance.
- Failed Thermostat/Bi-Metal Spring: This small coiled spring senses engine heat and controls choke movement. When it fails, the choke may stay closed or never open.
- Carburetor Clogs or Air Leaks: Dirt, varnish, or old fuel inside the carburetor can prevent proper fuel flow, leading to lean or rich mixtures.
- Heat Shield or Muffler Debris: Many auto choke systems rely on engine heat to function. Missing shields or blocked heat paths delay choke opening.
Each of these problems has a specific fix, and we’ll walk through them step-by-step below.
How to Diagnose Auto Choke Problems Quickly
Before you start replacing parts, perform a quick 10-minute inspection to narrow down the culprit. You don’t need fancy tools—just a screwdriver, carb cleaner, and a bit of light.
Step-by-step diagnosis:
- Ensure the engine is completely cold (sitting for several hours).
- Remove the air filter cover and filter.
- Look into the carburetor throat—you’ll see a small metal plate (the choke plate). When cold, it should be fully closed.
- Gently move it with your finger. It should swing freely and return to position via spring tension.
- Start the engine. Watch the choke plate—within a minute or two of running, it should gradually open.
If the choke doesn’t close when cold or fails to open when hot, you’ve confirmed a malfunction in the choke linkage, spring, or thermostat.
Quick Fix: Cleaning and Adjusting the Choke Mechanism
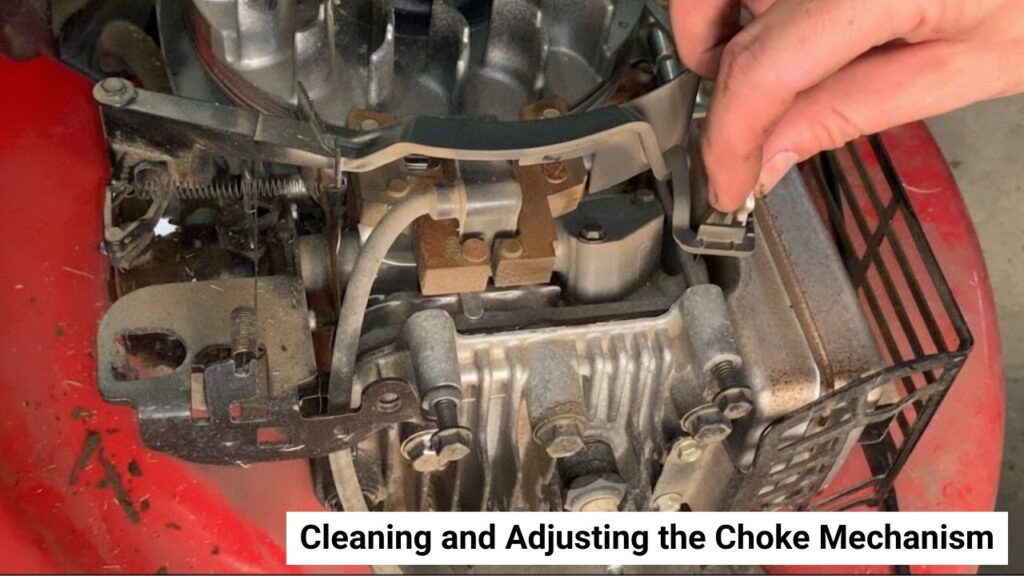
In many cases, the simplest solution is also the most effective. Dirt, sticky fuel residue, or corrosion can lock the choke plate or pivot shaft. A quick cleaning may restore full function without any parts replacement.
Here’s how to clean the auto choke mechanism:
- Start with a cold engine. Disconnect the spark plug wire for safety.
- Remove the air filter and base to expose the choke area.
- Spray carburetor cleaner directly on the choke plate, shaft, and linkage joints.
- Move the choke by hand while spraying to free up any sticky residue.
- Use a soft toothbrush or cotton swab to wipe away loosened debris.
- Once it moves freely, apply a light coat of dry PTFE lubricant (avoid oily sprays that attract dust).
- Reassemble and test again.
If your mower starts easily when cold and the choke opens within a few minutes of running, you’ve likely solved the issue.
This method works for about 70% of “Craftsman lawn mower auto choke not working” cases—especially after winter storage or when using old gasoline.
Testing the Choke Plate Cold vs. Warm
If cleaning doesn’t fix the problem, the next step is to see if the thermostat or bi-metal spring is functioning correctly. This spring is what tells the choke when to open as the engine warms up.
Cold test:
When the mower has cooled overnight, remove the air filter and check that the choke plate is closed. If it’s partially open, the thermostat spring may be weak or the linkage bent.
Warm test:
Start the mower and let it run for about five minutes. Watch the choke plate closely—it should slowly open as heat transfers to the thermostat. If it stays closed even when the engine is warm, the thermostat spring isn’t responding.
Gently touch the thermostat housing. It should feel warm. If it’s warm but the choke hasn’t moved, the thermostat is likely defective. Replacing it is simple and takes less than an hour.
Replacing a Faulty Auto Choke Thermostat or Bi-Metal Spring
Replacing the auto choke thermostat sounds intimidating, but it’s actually one of the easier lawn mower repairs you can do. Most Craftsman mowers use Briggs & Stratton or Kohler engines, both of which have accessible thermostat housings located near the muffler or intake manifold.
Follow these steps:
- Identify your engine model number (found on the blower housing or valve cover).
- Order the correct “auto choke thermostat kit” for your specific engine.
- Remove the air filter cover, filter, and base.
- Locate the thermostat housing—it’s usually a small metal or plastic module with a thin linkage connecting to the choke lever.
- Take a clear photo before disconnecting anything (for reference).
- Carefully unhook the linkage rod and return spring.
- Unscrew and remove the old thermostat.
- Install the new one with any included gasket, ensuring the same orientation.
- Reconnect the linkage and spring exactly as before.
Once reassembled, perform a cold-to-warm test. The choke should be fully closed at startup and open completely after a few minutes.
This simple replacement often restores perfect automatic choke operation, eliminating rough starts or stalling.
Inspecting Linkages, Springs, and Vacuum Pull-Off Units
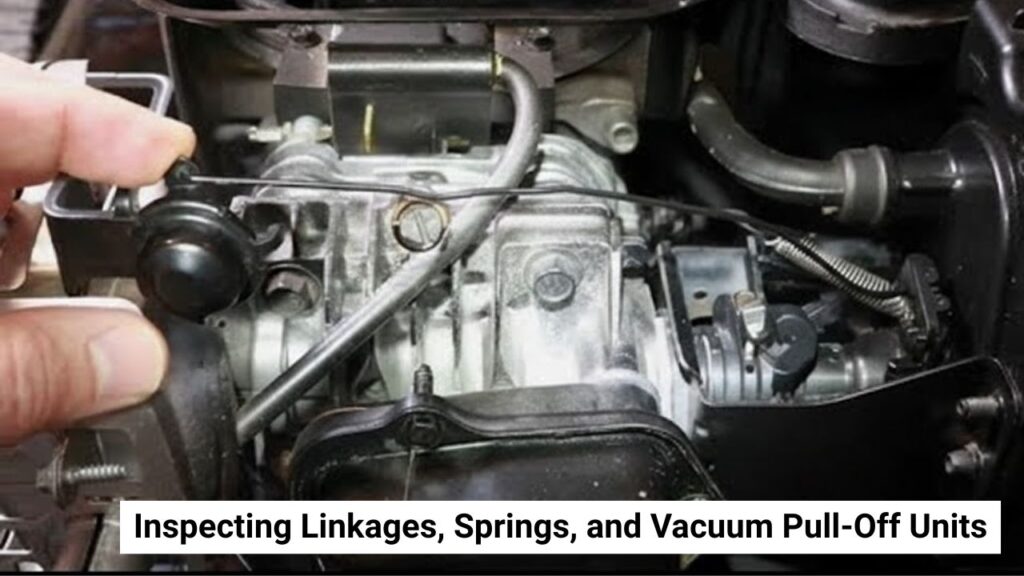
Some Craftsman mowers—especially those with Briggs “ReadyStart” engines—use a vacuum-assisted choke pull-off system. This feature slightly opens the choke immediately after startup to prevent flooding.
If your mower starts but stalls quickly or emits black smoke, the pull-off system may be at fault.
Here’s what to check:
- Look for a small rubber hose running from the carburetor or intake manifold to a round diaphragm near the choke.
- Inspect the hose for cracks or loose fittings. Replace it if it looks dry or split.
- Test the diaphragm by applying gentle suction with your mouth or a handheld vacuum pump. The rod should move and hold its position. If it doesn’t, replace the diaphragm.
- Examine all choke springs. If one appears stretched, rusted, or missing, replace it with an OEM part.
Expected result:
When cold, the choke should fully close. After the engine fires, it should crack open slightly (just enough to prevent rich flooding). If this happens, your system is working perfectly.
Addressing Fuel and Air Issues That Mimic Choke Failure
Sometimes, your Craftsman lawn mower auto choke not working isn’t actually the choke’s fault at all. Fuel and air delivery problems can produce nearly identical symptoms.
For instance, if your mower runs only when partially choked, it’s likely running lean—meaning it’s not getting enough fuel. This can be due to:
- Clogged main jet or emulsion tube inside the carburetor.
- Leaky carburetor gaskets allowing extra air in.
- Cracked intake manifold or worn seals.
Fixing these issues:
- Turn off the fuel valve and remove the carburetor bowl.
- Spray carb cleaner through the jet holes and passages.
- Use a soft wire or bristle to clear any deposits (avoid drill bits or hard steel).
- Check the carb mounting gasket for cracks or flattening. Replace if necessary.
- Finally, install a new air filter—a dirty filter can mimic rich running and confuse the choke system.
After cleaning, your mower should idle smoothly and respond well under load, even with the choke fully open.
Preventing Future Auto Choke Problems
Once you’ve gone through the effort of cleaning and adjusting your choke system, you’ll want to keep it running smoothly for the long haul. Preventative maintenance is key.
Here are some simple tips to prevent auto choke failure:
- Use fresh gasoline and a fuel stabilizer if storing the mower for more than 30 days.
- Clean or replace the air filter every 10–15 hours of use.
- Avoid over-oiling the choke pivots—use dry PTFE or silicone-based lube instead.
- Keep the muffler heat shield intact and clear of debris, as it’s vital for thermostat heat transfer.
- Check linkage and spring tension every mowing season.
- Store your mower indoors, away from moisture and direct rain exposure.
Following these steps not only prevents choke sticking but also extends your mower’s engine life and overall reliability.
Seasonal Storage and Reset: Getting Your Mower Ready for Spring
Every mower owner knows that the first start of spring can be the toughest. After sitting idle through cold months, even a perfectly functioning mower can struggle to start. When you notice your Craftsman lawn mower auto choke not working after winter, it’s often due to stale fuel and stuck choke parts rather than serious mechanical failure.
During storage, gasoline degrades into varnish, gumming up the choke pivot, carburetor jets, and linkage points. Moisture may also lead to rust on small metal springs and connectors. That’s why performing a seasonal reset before mowing season begins is vital.
Here’s a pre-season checklist:
- Drain old fuel and refill with fresh, ethanol-free or E10 gasoline.
- Add a fuel stabilizer if you expect long gaps between uses.
- Remove and clean the spark plug. Check the gap (typically 0.020–0.030 inches).
- Inspect the thermostat area and muffler shield for debris—rodents often build nests around these warm parts.
- Check governor and throttle linkages for free movement.
- Clean or replace the air filter to ensure proper airflow.
When done right, this quick tune-up restores the choke’s movement and ensures your mower starts on the first or second pull every time.
Pro Tips for Troubleshooting Like a Technician
Fixing a Craftsman lawn mower auto choke not working can feel overwhelming the first time, but with a few insider tricks, you’ll diagnose problems like a pro. These are lessons learned from years of working on small engines and from the mistakes most beginners make.
1. Take photos before disassembly.
The choke linkage has tiny bends and curves that matter. A quick snapshot ensures you reconnect everything exactly right later.
2. Test manually before assuming failure.
Use your finger or a screwdriver to move the choke lever and feel for resistance. If it moves freely when you assist it but not automatically, your issue is with the spring or thermostat—not the plate.
3. Use hand diagnostics.
When the engine is idling roughly, briefly cover the carburetor intake with your hand. If the engine smooths out, it’s running lean—check for clogged jets or vacuum leaks.
4. Watch for choke plate wear.
If the choke plate wiggles loosely or doesn’t seal well, the shaft bore may be worn. Replacing the entire carburetor is usually easier and cheaper than trying to rebush the bore.
5. Replace cheap parts first.
Choke springs and linkage rods cost very little. If you’re unsure which part failed, start by replacing the inexpensive items before investing in a full thermostat kit.
These small habits save both time and money and help you better understand how your Craftsman mower’s auto choke system behaves over time.
Advanced Fixes: When Cleaning Isn’t Enough
Sometimes, despite thorough cleaning and testing, your Craftsman lawn mower auto choke not working symptoms persist. In that case, it’s time to look deeper at the carburetor and intake system.
A choke issue can be a sign of internal fuel system imbalance—especially if your mower surges, stalls, or only runs on partial choke.
Step 1: Clean the Main Jet and Idle Circuit
- Turn off the fuel valve or clamp the fuel line.
- Remove the carburetor bowl using a 10mm wrench.
- Unscrew the main jet (usually brass-colored) and spray carb cleaner through it.
- Use a soft wire to clear any stubborn buildup.
- Also clean the small idle circuit holes near the top of the carb body.
Step 2: Check for Air Leaks
- Reassemble the carburetor and start the engine.
- Spray carb cleaner around the base of the carb and intake manifold while it’s idling.
- If the RPM changes, there’s an air leak. Replace the gasket or tighten bolts evenly.
Step 3: Replace the Air Filter
A clogged air filter prevents the choke from opening correctly by restricting airflow. Always replace it every season or sooner if mowing dusty areas.
When these steps are completed, most owners notice immediate improvement—smoother idle, faster starts, and consistent running even after the engine warms up.
Cost Breakdown: DIY vs. Professional Repair
One question many mower owners ask is whether it’s worth fixing the choke system themselves or hiring a professional. The answer depends on your comfort level, available time, and the severity of the issue.
Here’s a simple cost comparison table:
| Repair Type | DIY Cost (Parts Only) | Professional Service Cost | Time Required |
|---|---|---|---|
| Choke cleaning and lubrication | $0–$10 | $60–$90 | 20 minutes |
| Replace choke spring or linkage | $5–$15 | $70–$100 | 30 minutes |
| Replace thermostat/bi-metal spring | $15–$40 | $100–$150 | 45 minutes |
| Replace carburetor assembly | $25–$60 | $90–$180 | 1 hour |
As you can see, most repairs are inexpensive when done at home. In fact, for less than $20, you can usually restore full function and avoid a trip to the shop. However, if you suspect internal engine damage, governor failure, or severe fuel contamination, it’s best to let a certified small-engine technician handle it.
When to Call a Professional
Even experienced DIYers occasionally hit a wall. You should call a professional if:
- The choke linkage and thermostat test fine, but the mower still won’t start without manual assistance.
- The engine only runs on half choke despite a clean carburetor.
- You notice fuel leaks, oil smelling like gasoline, or black smoke after running.
- The choke plate appears loose or wobbly in the carburetor shaft.
A qualified technician can inspect deeper components like the governor, intake seals, or carburetor bushings—things most homeowners can’t easily fix at home.
When choosing a repair shop, look for:
- Factory certification for Briggs & Stratton, Kohler, or Craftsman engines.
- Clear labor rates and part estimates before work begins.
- A service warranty (30–90 days is standard).
If your mower is still under warranty, avoid modifying linkages or drilling jets yourself. Always have an authorized shop handle it to protect coverage.
Warranty and Long-Term Reliability Tips
A properly functioning auto choke system not only makes your mower easier to start but also maintains efficient fuel combustion, extending engine life. Craftsman designs its engines to last several years with proper maintenance, and keeping the choke clean is a big part of that.
Warranty advice:
- Never attempt to bypass or disable the auto choke—it can void warranty coverage.
- Keep service receipts and notes of any replacement parts used.
- Use OEM components whenever possible. Generic springs or thermostats may not align perfectly, causing improper choke timing.
Long-term care:
- Clean the choke assembly and carb area once per season.
- Keep the engine area covered when stored outdoors to prevent corrosion.
- Periodically check choke operation manually—close when cold, open when warm—to confirm all is well.
Frequently Asked Questions
1. How do I know if my Craftsman mower’s choke is stuck closed?
If the choke plate remains fully closed even after the engine warms up, it’s stuck. You may notice black smoke, sputtering, or the engine dying after a few seconds. Cleaning the choke plate pivot and verifying spring movement usually solves this.
2. Why does my mower start only with manual choking?
When your Craftsman lawn mower auto choke not working requires manual assistance, it means the automatic closing mechanism isn’t functioning. Check for weak thermostat springs or disconnected linkage rods. Clean and lubricate these areas first.
3. Can I convert my Craftsman mower from auto choke to manual choke?
Technically yes, but it’s not recommended. Manual conversions require drilling and re-routing linkages, which can void emissions compliance and warranty. Fixing the auto choke is faster, cheaper, and more reliable.
4. What causes a mower to surge even after fixing the choke?
Surging after choke repair usually points to a lean fuel mixture or vacuum leak. Clean the carburetor jets, check the intake gasket, and make sure the choke plate fully opens at operating temperature.
5. How long should the choke stay closed when cold?
On most Briggs & Stratton “ReadyStart” systems, the choke remains fully closed for about 30–60 seconds in moderate weather and slightly longer in colder temperatures. If it opens too soon, the thermostat spring is likely weak.
6. Is carb cleaner safe for the choke and thermostat components?
Yes, but avoid soaking rubber diaphragms or plastic parts for long periods. Wipe excess fluid off and apply dry PTFE spray afterward to maintain smooth movement without attracting dust.
7. How often should I replace the thermostat spring?
There’s no set interval. Replace it only when it no longer moves with heat or appears rusted, bent, or broken. With proper care, a thermostat can last many mowing seasons.
8. What’s the quickest way to confirm if my auto choke works?
Start the engine cold while watching the choke plate. It should be closed initially, then begin to open within 1–3 minutes as the engine warms. If it doesn’t, the auto choke system needs cleaning or a thermostat replacement.
Common Mistakes to Avoid
Even the best DIY repairs can go wrong if small details are overlooked. Here are a few pitfalls to avoid while fixing your Craftsman lawn mower auto choke not working issue:
- Over-bending linkage rods. Even a small misalignment can throw off choke timing.
- Using oil-based lubricants. They attract dirt, causing the choke to stick again.
- Skipping the air filter check. A blocked filter changes airflow, confusing the choke.
- Ignoring the heat shield. Missing or damaged shields stop proper heat transfer to the thermostat.
- Not testing warm operation. Many owners test only the cold start and assume the job’s done—but if the choke fails to open fully, rich running can damage the spark plug and waste fuel.
Avoiding these mistakes ensures a lasting, smooth-running repair.
Alternative Fixes and Upgrade Options
If you’ve tried every method but your auto choke still won’t function, there are alternative solutions that may suit your needs better.
| Solution | Pros | Cons | Best For |
|---|---|---|---|
| Replace full carburetor assembly | Fast and restores full performance | Slightly higher cost | Persistent or complex choke problems |
| Install OEM thermostat and linkage kit | Factory calibration and reliability | Requires disassembly | Choke movement failure |
| Get professional tune-up | Saves time and ensures thorough check | Labor cost | Busy owners or recurring issues |
Sometimes, replacing the entire carburetor is faster and cheaper than continued troubleshooting—especially if you’re dealing with corrosion or years of buildup.
Bringing It All Together: The Final Tune-Up
To recap, when your Craftsman lawn mower auto choke not working, you can follow these essential steps to bring it back to life:
- Clean the choke plate, linkage, and pivot shaft thoroughly.
- Inspect and replace any weak or damaged choke springs.
- Test cold-close and warm-open movement of the choke plate.
- Replace the thermostat or bi-metal spring if there’s no motion with heat.
- Eliminate carburetor blockages and intake air leaks for balanced fuel flow.
- Maintain the system through seasonal checks and proper storage.
By following this systematic approach, you’ll eliminate guesswork and save both time and money. Most importantly, you’ll gain the satisfaction of understanding and maintaining your mower like a professional.
Conclusion: Get Your Craftsman Mower Running Like New
Dealing with a Craftsman lawn mower auto choke not working may seem frustrating, but it’s one of the most fixable mower problems you can face. With patience, a few simple tools, and the right knowledge, you can restore that effortless one-pull start and smooth operation your mower had when it was new.
Whether it’s cleaning a sticky plate, replacing a tired thermostat, or tightening a loose gasket, each step brings your mower closer to full strength. Take your time, follow the process, and remember that every repair teaches you more about how your machine works.
