
How To Use A Lawn Mower Blade Sharpener: Easy Guide
A sharp lawn mower blade helps your mower cut grass cleanly instead of tearing the tips. A dull blade can leave a ragged lawn, make the engine work harder, and cause extra vibration. Learning how to use a lawn mower blade sharpener is a useful skill for first-time homeowners, renters with outdoor storage, and experienced DIY users.
The job is not hard, but it does require care. You need the right sharpener, a stable blade, a steady angle, and safe handling. A hand file may suit a small push mower. A bench grinder may suit someone who maintains several gas mowers. A drill-mounted sharpener can be a simple middle ground for many home users.
This guide explains how to sharpen a mower blade by hand, with a drill attachment, or with a bench grinder. It also covers blade removal, sharpening angles, balance checks, common errors, costs, storage, and when a blade should be replaced rather than sharpened.

Quick answer: How do you use a lawn mower blade sharpener?
The best way to use a lawn mower blade sharpener is to remove the blade, clean it, secure it, and sharpen only the cutting edge while keeping the factory angle. Use a file for slow, controlled work, a drill sharpener for simple touch-ups, or a grinder for fast sharpening. Wear safety glasses and gloves, disconnect the spark plug or remove the battery, and balance the blade before reinstalling it.
Tools and materials you need
The tools you need depend on the mower and sharpener. A basic push mower often needs only a socket wrench, a block of wood, a file, and a blade balancer. A riding mower may need a larger socket, a lifting tool, and more room to work.
Always check the mower manual before removing the blade. Some mower bolts use a standard thread, while others may have special washers, spacers, or blade adapters.
| Tool or material | Why you need it | Good choice for |
|---|---|---|
| Socket wrench and correct socket | Removes the blade bolt | Push, self-propelled, and riding mowers |
| Wood block or blade holder | Stops the blade from turning | Most mower types |
| Safety glasses | Protects eyes from metal dust | Every user |
| Work gloves | Protects hands from sharp edges | Every user |
| File or sharpening stone | Gives slow, controlled sharpening | Beginners and small yards |
| Drill-mounted sharpener | Guides a basic bevel angle | Homeowners who want faster touch-ups |
| Bench grinder | Removes metal quickly | Experienced DIY users |
| Blade balancer | Checks whether both ends weigh the same | Anyone sharpening a blade |
| Wire brush or rag | Removes grass and rust | Blades with buildup |
| Torque wrench | Tightens the blade bolt correctly | Careful repair work |
A blade balancer is not expensive compared with the cost of a damaged spindle. It can help prevent vibration after sharpening. If you maintain more than one mower, it becomes even more useful.
A bench grinder also needs a firm workbench and good lighting. Do not buy one just because it works fast. For a small yard and one push mower, a file or drill sharpener may be easier to store and safer to control.

Choose the right type of blade sharpener
The main difference between mower blade sharpeners is how much metal they remove and how much control they give you. Hand tools remove metal slowly. Power tools save time but can overheat or change the blade shape if you rush.
Hand file or sharpening stone
A flat mill file is the simplest mower blade sharpener. It works without electricity and gives you strong control over the cutting edge. It is a good fit for a homeowner who sharpens one blade two or three times during the mowing season.
Hold the file so it follows the existing bevel. Push the file across the edge in one direction. Lift it on the return stroke instead of scraping back and forth.
A hand file takes more time than a grinder. It also may not remove deep nicks quickly. Still, it is quiet, inexpensive, and easy to store in a garage, shed, or apartment storage area.

Drill-mounted blade sharpener
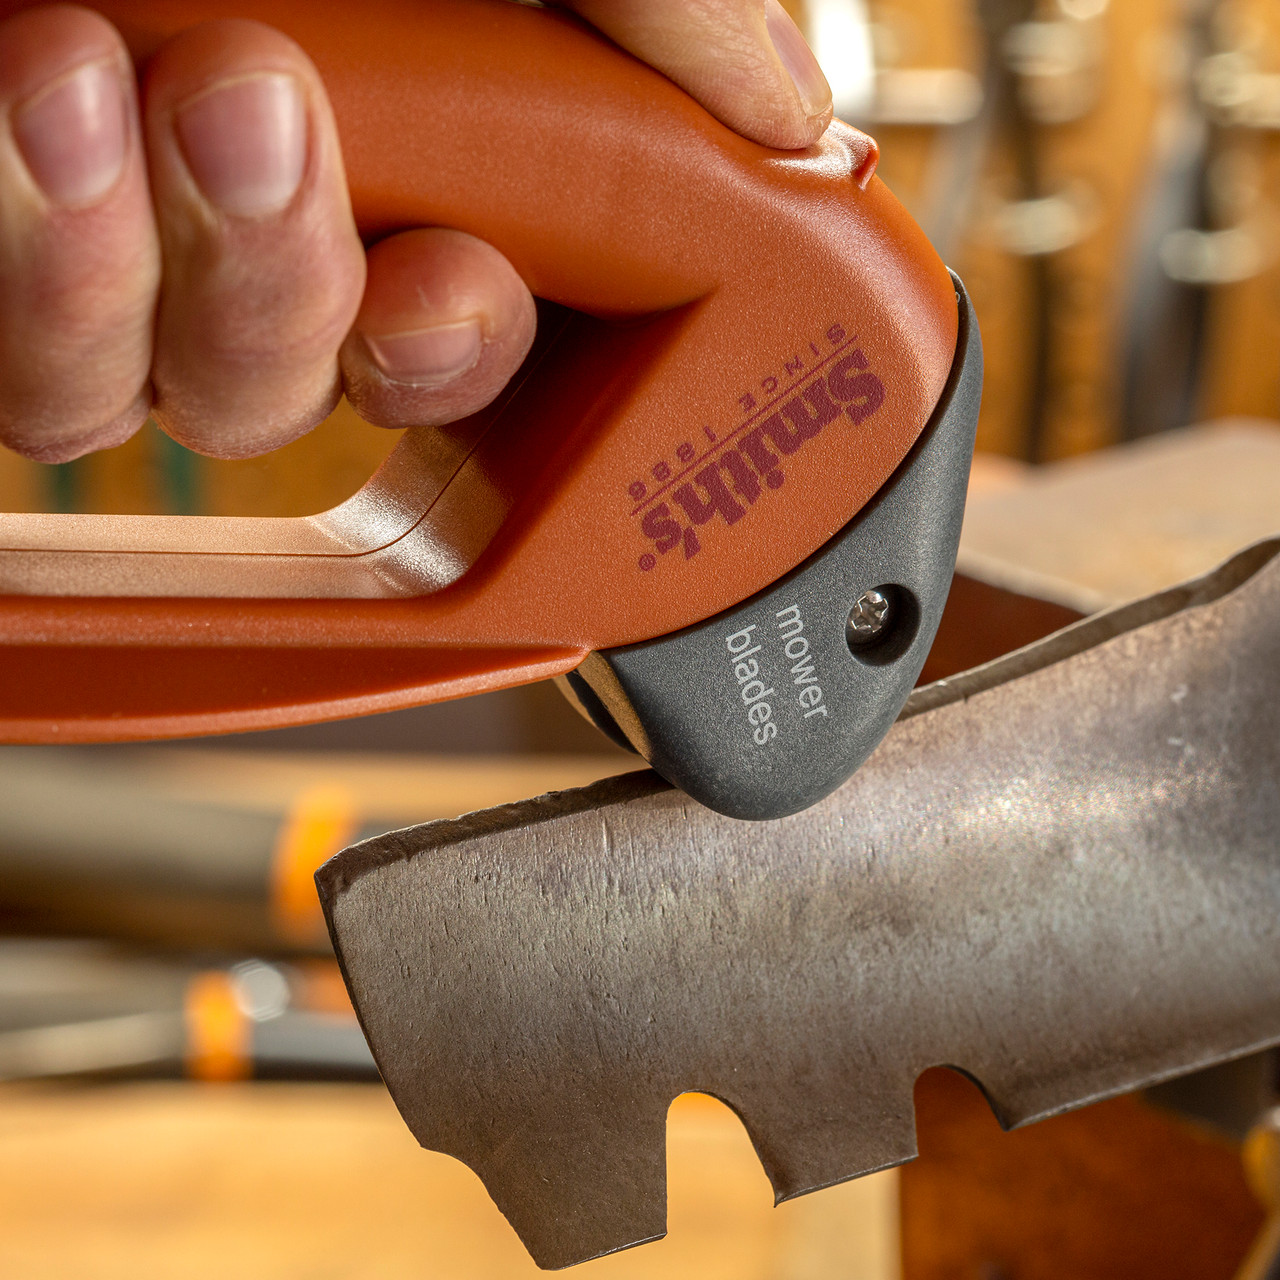
A drill-mounted sharpener fits into a cordless or corded drill. Many models use a guide that helps hold the sharpening angle. This makes the tool useful for beginners who want more speed than a hand file.
Use short passes and light pressure. Let the tool guide the bevel. Do not force the sharpener into the blade, because that can remove too much metal or create an uneven edge.
A cordless drill with a 12-volt or 18-volt battery can handle light touch-up work. Check the sharpener instructions before use. Some attachments are designed for a specific blade thickness or edge style.

Bench grinder
A bench grinder uses a spinning abrasive wheel to sharpen metal quickly. It suits experienced DIY users, landscapers, and people who maintain gas push mowers, self-propelled mowers, riding mowers, or zero-turn mowers.
A grinder can remove a damaged edge in minutes. It can also overheat the blade in seconds. Dip the blade in water often, or pause to let it cool, if the tool instructions allow it.
Do not use a bench grinder near fuel, loose grass, or other flammable material. A grinder needs eye protection, a stable bench, and a clear work area.

Angle grinder
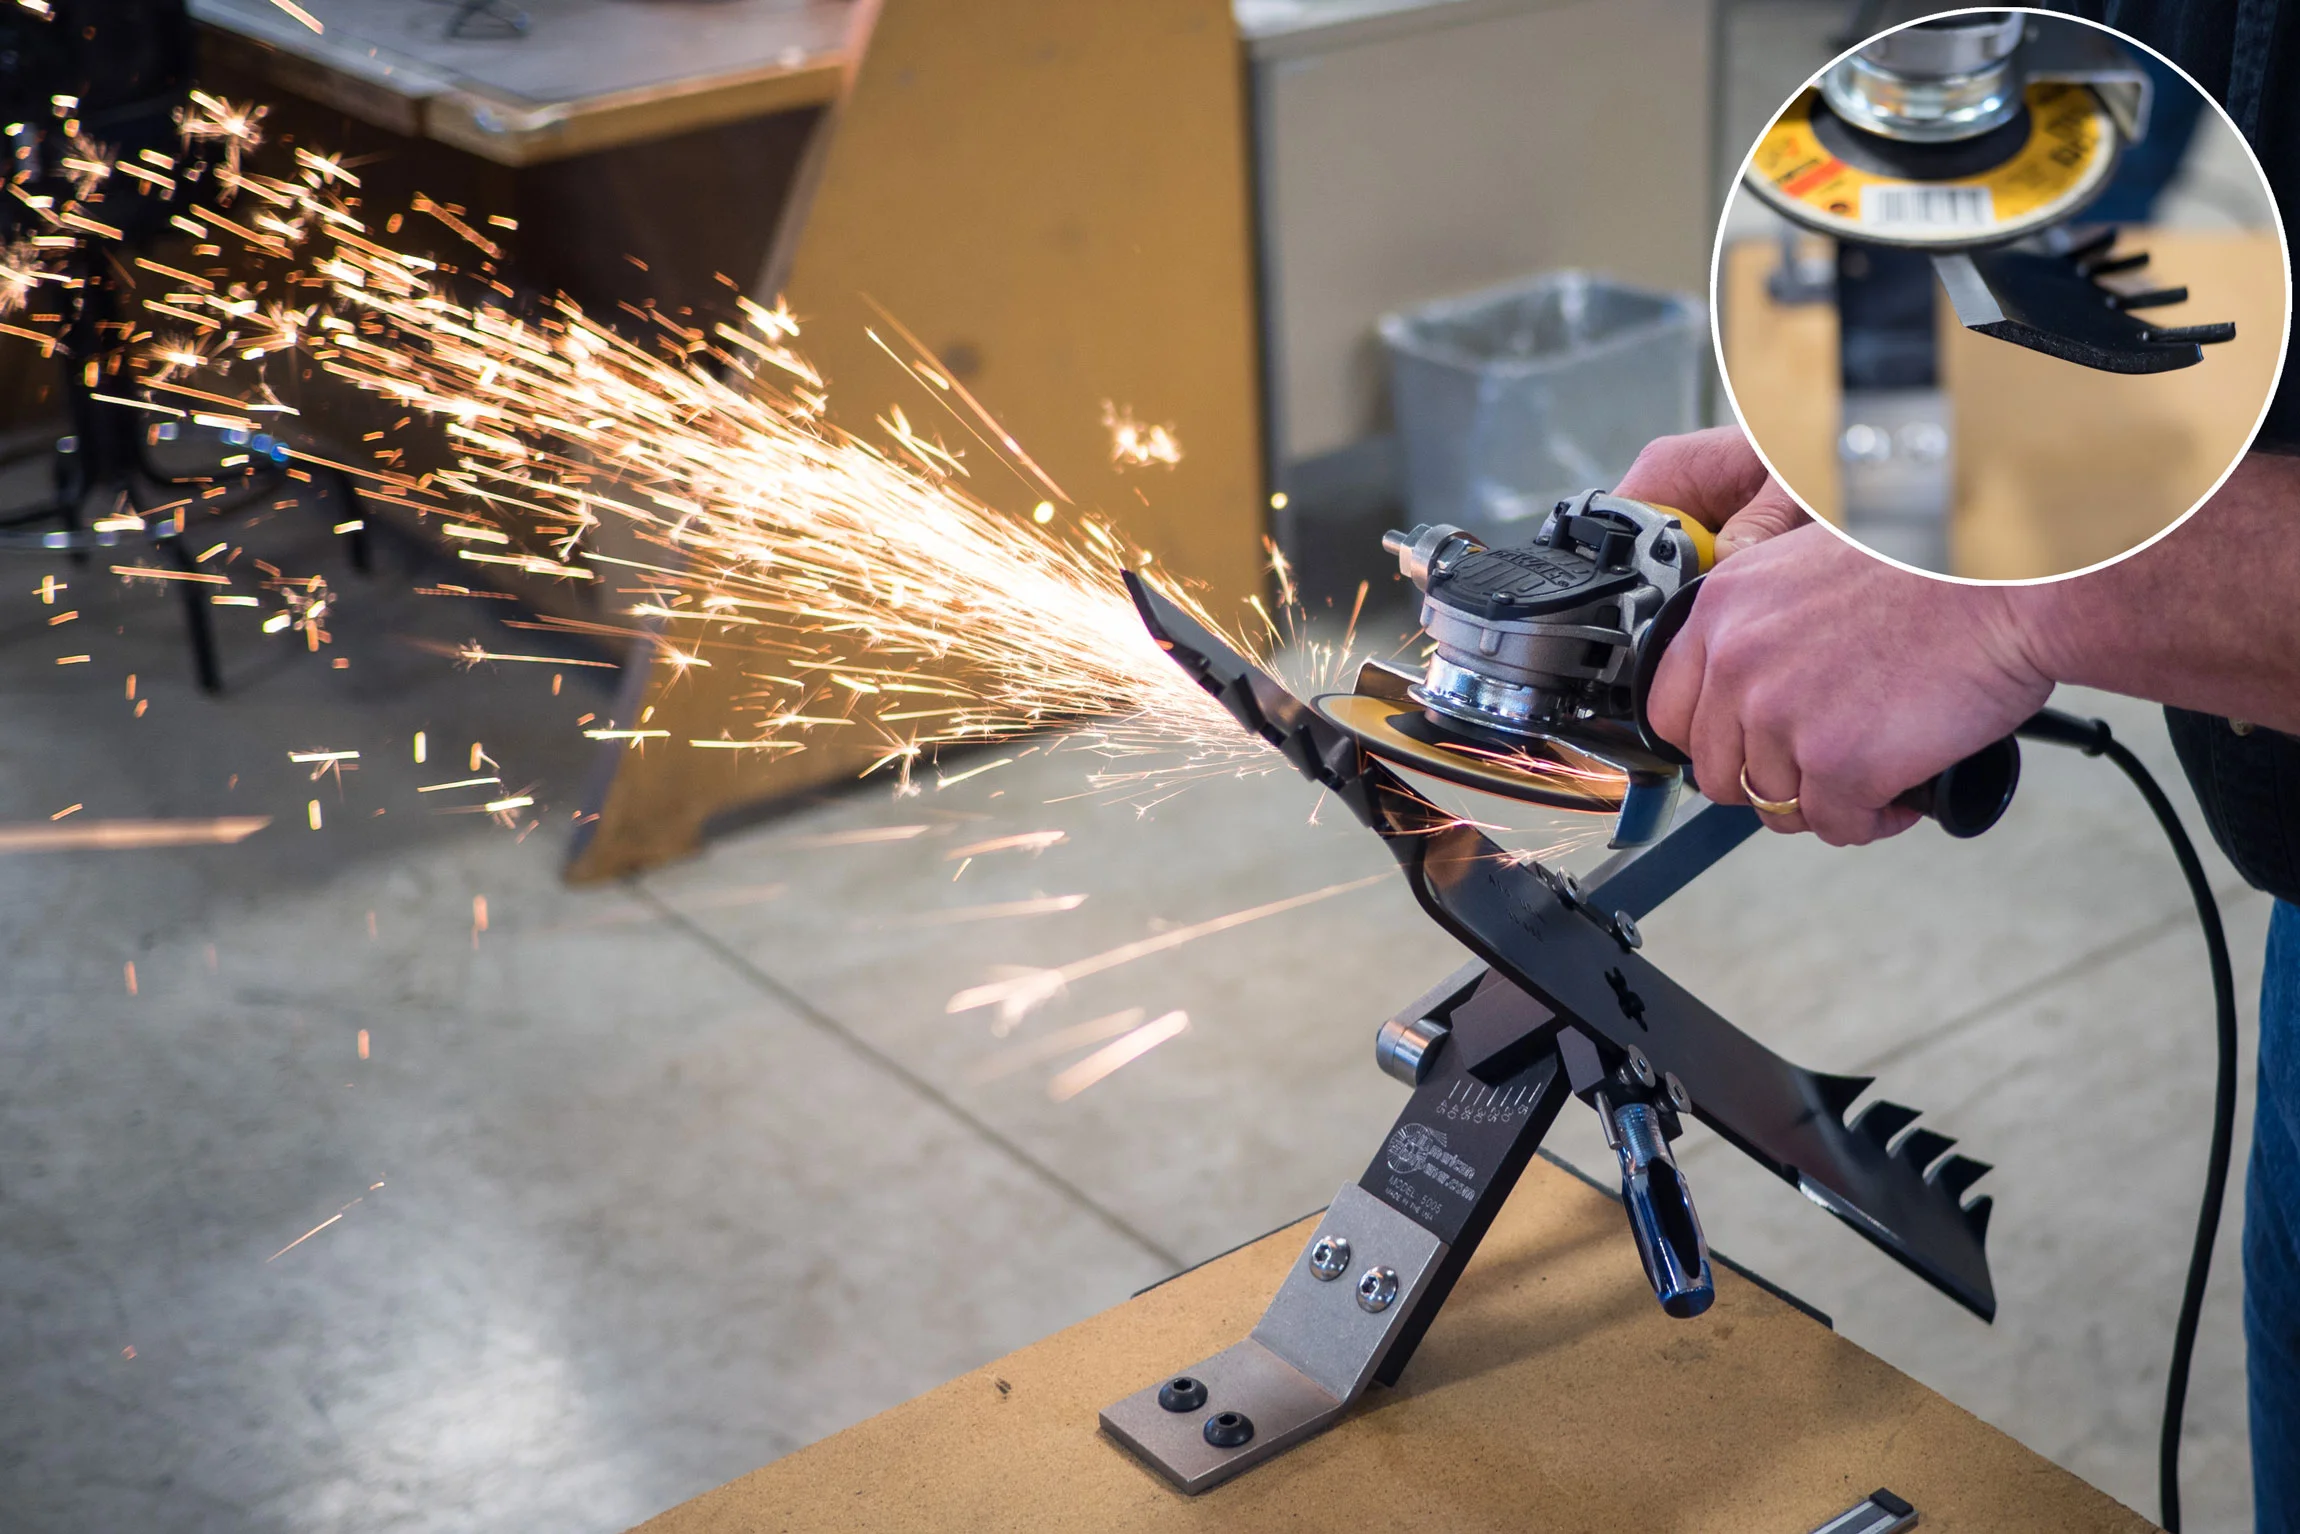
An angle grinder can sharpen a mower blade, but it gives you less built-in control. It is best for experienced users who know how to hold a steady bevel. It can also create deep grooves if you stay in one spot.
An angle grinder is not the first choice for most new homeowners. A file or drill-mounted sharpener is easier to control. If you use an angle grinder, secure the blade in a vise and keep both hands on the tool.
The table below compares the common options. Choose based on your yard, skill, storage space, and need for speed.
| Sharpener type | Main advantage | Main limitation |
|---|---|---|
| Hand file | Low cost and high control | Takes more time |
| Drill attachment | Simple angle guide and quick touch-ups | Needs a drill and steady passes |
| Bench grinder | Fast metal removal | Can overheat or reshape the blade |
| Angle grinder | Useful for heavy damage | Requires strong tool control |
For a small yard, a hand file is often enough. For several mowers or frequent repair work, a bench grinder may save time. A drill attachment can suit a gift buyer looking for a practical tool for a new homeowner.

Safety and preparation come first
Safe blade sharpening starts before the blade leaves the mower. Park the mower on a flat surface. Turn off the engine, remove the key, and wait for all moving parts to stop.
For a gas mower, disconnect the spark plug wire and move it away from the plug. This helps prevent an accidental start. For a battery mower, remove the battery pack and keep it away from the work area.
Wear safety glasses, closed-toe shoes, and work gloves. Use hearing protection with a grinder. Clear the floor of fuel, dry grass, loose tools, and anything that could catch on a spinning wheel.
⚠️ Safety Warning: Never reach under a mower deck while the blade may move. Disconnect the spark plug or remove the battery before servicing, even if the mower appears off. Follow the owner’s manual for your exact mower.

Clean the mower deck first
Grass clippings and thatch can hide the blade bolt and make the blade harder to remove. Thatch is a tight layer of dead stems near the soil surface. It is not the same as loose clippings, but both can collect under the deck.
Use a plastic scraper or stiff brush to clear buildup. Avoid spraying water into the engine, battery housing, controls, or electrical parts. A dry brush works well for routine cleaning.
Do not tilt a gas mower in a way that lets oil or fuel run into the air filter or carburetor. Many manuals recommend tipping the mower with the air filter and carburetor facing up. Check your manual before lifting or tilting any mower.

Set up a stable work area
Place the blade on a solid workbench or clamp it in a vise. The cutting edge should face away from your body. Keep the blade flat and make sure it cannot shift during sharpening.
For a riding mower or zero-turn mower, use the approved lifting method. A mower jack with a suitable weight rating can provide access, but never rely on an unstable stack of wood or a single weak support.
Good lighting matters. You need to see the old bevel, cracks, bends, and nicks. A dark shed is not a safe sharpening station.

How to use a lawn mower blade sharpener step by step
The best sharpening method keeps the original blade shape. You are not trying to make the edge razor-thin. A mower blade needs a durable cutting edge that can handle grass, small sticks, and occasional debris.
1. Identify the blade type and mounting position
Before loosening the bolt, look at the blade and take a photo. Note which side faces down toward the grass. Many blades have labels such as “bottom,” “grass side,” or “this side up.”
Some blades are straight. Others are high-lift blades with raised wings that help move grass into a catcher. Mulching blades often have extra curves or fins. The shape affects how the mower moves grass, so reinstall it in the same position.
Measure the deck and check the blade part number if you need a replacement. A 21-inch blade is not interchangeable with every 21-inch mower blade. The center hole, side holes, lift shape, thickness, and adapter must match.

2. Remove the blade safely
Place a wood block against the inside of the deck or use a blade holder to stop rotation. Fit the correct socket on the blade bolt. Turn the bolt in the correct direction based on your mower manual.
Some blade bolts are tight because of years of grass, rust, and repeated impacts. Use steady pressure. Avoid striking the socket with a hammer unless the manual or manufacturer permits it.
Once the bolt is out, keep the bolt, washer, adapter, and any spacers together. Put them in a small tray or container. Losing a spacer can change blade height and create a dangerous fit.

3. Inspect the blade before sharpening
Wash or brush off dirt so you can inspect the steel. Look for cracks, deep bends, missing chunks, stretched center holes, and thin sections along the edge.
A slightly dull blade can usually be sharpened. A blade with a crack should be replaced. Do not try to weld a cracked mower blade. The blade spins at high speed, and a failure can damage the mower or cause serious injury.
Replace a blade that is badly bent from hitting a rock, pipe, stump, or edging block. Sharpening removes metal, but it does not restore safe structure.

4. Find the factory bevel
The bevel is the sloped surface that meets the cutting edge. Most mower blades have a bevel on one side of each cutting edge. The exact angle varies by blade, so use the existing bevel as your guide.
Do not grind the flat back of the blade unless the manufacturer says to do so. The goal is to refresh the bevel, not change the blade’s profile.
If you cannot see the bevel, place a file against the edge. Tilt it until it sits flush with the old slope. This is often more reliable than guessing a number such as 30 degrees.

5. Secure the blade
Clamp the center section in a vise, or hold the blade firmly on a bench with the cutting edge facing away. Do not hold a loose blade in one hand while using a grinder with the other.
Use soft jaw covers or a piece of cardboard if the vise may mark the blade. Keep the blade level. A moving blade can cause an uneven bevel and may catch the file or grinder.
For a drill sharpener, follow the attachment instructions. Some tools are used with the blade still attached to the mower, but removing the blade gives you better control and makes inspection easier.
6. Sharpen with a hand file
Place the file on the existing bevel. Push it from the thick side toward the cutting edge. Use smooth strokes that cover the full width of the bevel.
Count your strokes on each side. You may need 10 to 30 strokes on a lightly dull edge, but the number depends on the file, steel, and damage. Stop when the edge is clean and even.
A small burr may form on the opposite side. A burr is a thin flap of metal left after filing. Remove it with one or two light strokes, not heavy grinding.
7. Sharpen with a drill attachment
Insert the correct sharpening stone or attachment into the drill. Wear eye protection and keep the blade clamped. Start at a slow speed if your tool allows speed control.
Set the guide against the blade bevel. Use short passes from one end of the cutting edge to the other. Do not stay in one spot, because that can create a hollow or uneven edge.
Check your progress often. A drill sharpener is designed to guide the tool, but it cannot correct a loose blade, wrong attachment, or excessive pressure.
8. Sharpen with a bench grinder
Stand to the side of the grinding wheel, not directly in line with it. Turn on the grinder and let it reach full speed before touching the blade.
Hold the blade at the original bevel. Move it across the wheel in a smooth pass. Do not press hard. The wheel should remove a thin layer of metal.
Dip the blade in water after a few seconds, or pause often to let it cool. Blue or purple discoloration usually means the steel has overheated. If you see heat color, stop and cool the blade before continuing.
9. Keep both cutting edges even
Most mower blades have two cutting edges. Remove a similar amount of metal from each side. Uneven sharpening can make the blade unbalanced.
You do not need a mirror finish. The edge should be clean, consistent, and free of large nicks. A slightly blunt, durable edge is safer for mower work than a fragile knife edge.
Compare the two sides by sight and touch, but do not run a bare finger along the edge. Touch the flat sides only.
10. Check blade balance
Place the sharpened blade on a blade balancer, nail, screwdriver shaft, or another approved balance tool. The exact method should suit the blade hole and follow the tool instructions.
If one side drops, that side is heavier. Remove a small amount of metal from the heavier side. Recheck the blade often. Do not keep grinding the lighter side to match it.
A balanced blade helps reduce vibration. Excess vibration can stress the spindle, bolt, deck, and engine. It may also make the mower uncomfortable to operate.
11. Reinstall the blade correctly
Clean the blade bolt and inspect the washer. Replace damaged hardware. Fit the blade with the correct side facing the grass.
Tighten the bolt to the torque listed in the mower manual. A bolt that is too loose can allow blade movement. A bolt that is too tight can damage threads or make future service difficult.
Do not rely on feel if the manual gives a torque value. A torque wrench is helpful, especially on riding mowers and zero-turn mowers.
12. Test the mower carefully
Reconnect the spark plug wire or reinstall the battery only after the blade is secure. Move away from the mower deck before starting it.
Run the mower for a short time without engaging unusual features. Listen for strong vibration, rattling, scraping, or a pulsing sound. Stop the mower at once if something seems wrong.
Mow a small patch of grass and inspect the cut. Ragged tips may mean the blade still needs work, the grass is wet, the mowing height is too low, or the blade is damaged.
Common sharpening mistakes and simple fixes
Most mower blade sharpening problems come from rushing. The blade may be too hot, too thin, uneven, or installed backward. A slow check at each stage can prevent a costly repair.
| Problem | Likely cause | What to do |
|---|---|---|
| Strong vibration after sharpening | Blade is unbalanced or bent | Stop mowing and check balance and blade condition |
| Blue or purple metal | Blade overheated | Let it cool and avoid heavy grinding |
| Ragged grass tips | Dull edge, wet grass, or low mowing height | Sharpen lightly and mow when grass is dry |
| Blade will not fit | Wrong part, spacer, or orientation | Compare with the manual and original setup |
| Sharpener skips | Blade is loose or tool angle is wrong | Clamp the blade and match the old bevel |
| Bolt will not loosen | Rust or excess torque | Use penetrating oil and the correct socket |
| Edge looks wavy | Uneven pressure or grinding in one spot | Rework slowly with a file or light grinder passes |
Never solve vibration by simply tightening the blade bolt harder. Vibration often points to a bent blade, a balance problem, a damaged spindle, or a missing washer.
How much time and money does sharpening take?
Sharpening one push mower blade may take 20 to 45 minutes the first time. An experienced user may finish in 10 to 20 minutes with a ready work area. A riding mower blade can take longer because access is harder and the blade may be heavier.
The cost depends on whether you already own a drill, grinder, socket set, and blade balancer. A file is often the lowest-cost option. A bench grinder costs more but may be useful for regular equipment care.
| Method | Typical time for one blade | Best fit |
|---|---|---|
| Hand file | 25–45 minutes | One small mower and careful beginners |
| Drill sharpener | 15–30 minutes | Homeowners who want guided sharpening |
| Bench grinder | 10–20 minutes | Several mowers and experienced users |
| Repair shop service | Varies by location | People who lack tools or have damaged blades |
Prices and service fees change by store and location. Check current listings before buying. Also compare the cost of a replacement blade. A badly damaged blade may not be worth saving.
Beginner tips for better results
A first-time homeowner does not need a large tool collection. Start with a flat file, a socket set that fits the mower, safety glasses, gloves, and a basic balancer. This setup suits small yards and push mowers without taking much storage space.
If you are buying a sharpening tool as a gift, choose one that matches the recipient’s mower. Ask for the mower brand, model number, deck width, blade part number, and power type. A drill attachment is not useful if the person has no compatible drill.
Experienced DIY users may want a bench grinder and a torque wrench. That setup suits people who maintain several gas mowers, riding mowers, or landscaping tools. It is less suitable for a renter with limited storage or a user who dislikes loud tools.
Match the tool to the yard and user
A small, flat yard often needs a simple push mower and a hand file. A hilly lawn may use a self-propelled mower, but sharpening the blade is still done in the same basic way. The slope changes mowing safety, not the blade bevel.
A large property may use a riding mower or zero-turn mower. These machines often have wider decks and more than one blade. Remove and label each blade so you can return it to the correct position.
Robotic mowers and reel mowers have different blade systems. Robotic mower blades are usually small and replaceable. Reel mower blades use a cylinder and bed knife, so a standard rotary mower sharpener is not the right tool.
Keep the edge durable
Do not chase a razor edge. A mower blade hits grass, sand, small twigs, and hidden debris. A slightly stronger edge can last longer than a thin edge.
Sharpen when the blade becomes dull or when the cut looks torn. Many homeowners check the blade several times during the growing season. Sandy soil, dry weather, and frequent mowing can wear an edge faster.
Keep the mowing height suited to your grass and climate. Cutting too low can stress turfgrass during drought or heat. A sharp blade helps, but it cannot replace proper watering, mowing height, and soil care.
Consider noise and storage
Bench grinders and angle grinders are loud. Ear protection protects you, and local rules may limit when loud equipment can run. A hand file is quiet and suits shared driveways, small garages, and close neighbors.
Store the sharpener in a dry place. Keep files free of moisture. Store grinding wheels according to the manufacturer’s instructions, and do not use a wheel that is cracked or damaged.
Keep mower blades away from children. Label a box or bin for blades, bolts, spark plugs, air filters, and other small engine parts.
When to replace the blade instead
Sharpening is not the answer for every blade. Replace a blade if it has a crack, a deep bend, a missing section, a badly enlarged center hole, or severe rust that has weakened the steel.
A blade that has been sharpened many times may become too narrow. Compare it with a new blade of the same part number. If the cutting edge has moved far back or the lift wings are damaged, replacement is safer.
Use the exact replacement part or a verified equivalent. Confirm deck size, center hole, mounting holes, length, width, thickness, and lift direction. Never assume that a blade with the same length will fit.
When to hire a professional
Call a mower repair shop if you cannot safely lift the mower, cannot remove the blade bolt, or find a cracked or bent blade. A shop can also inspect the spindle, blade adapter, belt, and deck.
Professional help makes sense for a riding mower or zero-turn mower with several blades if you lack a rated lifting tool. It can also be wise for seniors or users with limited grip strength, balance, or mobility.
A repair shop may be the better value when the mower has strong vibration after sharpening. Continuing to mow can turn a blade problem into spindle or deck damage.
📜 Check Local Rules: Before using a gas mower, grinder, or fuel-powered equipment, check city noise rules, HOA limits, and local gas-equipment restrictions. Store fuel only as local law and the mower manual allow.
A simple mower blade maintenance routine
Blade sharpening works best as part of regular mower care. Inspect the blade before the main mowing season, after hitting a hard object, and whenever the mower vibrates.
Also check the air filter, spark plug, drive belt, wheels, deck, and grass catcher. Battery mowers need clean battery contacts and safe battery storage. Gas mowers need fresh fuel practices and may need fuel stabilizer during long storage.
| Maintenance task | When to check it | Why it matters |
|---|---|---|
| Inspect blade | Before mowing season and after impacts | Finds cracks, bends, and dull edges |
| Check balance | After every sharpening | Helps reduce vibration |
| Clean deck | Every few mowing sessions | Limits clippings and rust |
| Inspect spark plug | As listed in the manual | Supports reliable gas-engine starting |
| Clean air filter | As listed in the manual | Helps protect engine airflow |
| Check battery | Before charging and storage | Helps spot damage or swelling |
| Inspect belt and wheels | During seasonal service | Finds wear before failure |
Do not pressure-wash an electric mower or battery compartment. Keep the mower dry as directed by the manual. A clean deck and sharp blade can support steady mowing, but every machine still needs service based on its design.
Environmental and disposal notes
Do not pour old gasoline or engine oil into soil, drains, or trash. Take them to a local hazardous-waste site or approved collection point. Fuel can harm soil and water.
Recycle lithium-ion mower batteries through a designated battery drop-off or retailer program. Do not place loose lithium batteries in household recycling or regular trash.
A usable old mower may help another homeowner, community garden, or repair program. If it cannot be repaired, ask your local recycling center how to dispose of metal, plastic, batteries, and engine parts.
🌿 Eco or Disposal Note: Sharpening a sound blade can extend its useful life, but disposal must still be safe. Recycle metal where accepted and use approved programs for batteries, fuel, and oil.
Frequently asked questions
Q: How sharp should a lawn mower blade be?
A: It should have a clean, even cutting edge that is sharp enough to cut grass but not as thin as a kitchen knife. A durable bevel works better for normal mowing because the blade may contact sand, sticks, or small debris.
Q: What angle should I use to sharpen a mower blade?
A: Match the angle already formed on the blade. Many rotary mower blades use a moderate bevel, but the exact angle varies. Do not guess if the old bevel is visible, and check the owner’s manual when available.
Q: Can I sharpen a mower blade without removing it?
A: Some drill attachments are designed for touch-ups while the blade remains installed. Removing the blade is usually safer and gives you a better view of cracks, bends, and balance. Always disconnect the spark plug or remove the battery first.
Q: Is a file better than a grinder?
A: A file gives beginners more control and removes less metal. A grinder is faster for experienced users but can overheat the blade or change its shape. Choose the file for a small yard and occasional service; choose a grinder for frequent work and several mowers.
Q: Can I use a Dremel to sharpen a mower blade?
A: A rotary tool can work for small touch-ups, but it may be slow on a thick blade. Use the correct metal-cutting accessory, secure the blade, and keep the original bevel. A flat file or mower-specific sharpener is often easier.
Q: How often should I sharpen a mower blade?
A: Check the blade several times during the mowing season. Sharpen it when the edge is dull, grass tips look torn, or the mower needs more effort. Sandy soil and frequent mowing can wear the edge faster.
Q: Why does my mower vibrate after sharpening?
A: The blade may be unbalanced, bent, installed backward, or missing a washer or spacer. A damaged spindle can also cause vibration. Stop mowing and inspect the complete blade mounting system.
Q: Can I sharpen a cracked mower blade?
A: No. Replace a cracked blade. Do not weld it or keep using it. A mower blade spins at high speed, so structural damage creates a serious risk.
Q: Should I sharpen both sides of the blade?
A: Yes. Sharpen both cutting edges by a similar amount. Matching the two sides helps maintain balance and keeps the cut consistent.
Q: Is a lawn mower blade sharpener worth buying?
A: It can be worth buying if you own a mower, have safe workspace, and plan to maintain the blade more than once. A hand file costs less and stores easily. A drill attachment or grinder may be worthwhile for frequent users.
Q: What is the best sharpener for a senior?
A: A hand file is light and quiet but takes more effort. A drill-mounted guide can reduce filing time, but it still requires safe clamping and tool control. If lifting the mower or handling the blade is difficult, a repair shop is safer.
Q: Do reel mower blades use the same sharpener?
A: No. Reel mowers use a reel and bed knife rather than a single rotary blade. They need a different sharpening method, often called backlapping or reel grinding. Follow the reel mower manual.
Q: Can wet grass dull a mower blade?
A: Wet grass does not instantly dull the steel, but it can stick under the deck, create clumps, and make the mower work harder. Wet mowing also creates slip risks, especially on slopes. Mow when the grass is dry when possible.
Q: How long does a mower blade last?
A: Blade life depends on steel quality, mowing frequency, soil, debris, and impacts. A sound blade may last through many sharpening sessions, while one hard hit can bend or crack it. Inspect the blade rather than relying on a set time.
Q: Can I use a mower blade sharpener on a battery mower?
A: Yes, if the blade and sharpener are compatible. Remove the battery before blade removal or service. Confirm the blade part number and mounting system because electric mowers may use different blade shapes.
[CodeImg not included after FAQ per instruction]
Final advice
The best way to learn how to use a lawn mower blade sharpener is to start slowly with a sound blade and a hand file. Remove the blade, match the existing bevel, sharpen both edges evenly, and check balance before reinstalling it.
A drill-mounted sharpener can suit a homeowner who wants a faster touch-up. A bench grinder can suit an experienced DIY user with several mowers and a safe workbench. A repair shop is the right choice when the blade is cracked, bent, hard to remove, or unsafe to handle.
Keep safety first. Wear eye and hearing protection, clear debris, keep children and pets away, never mow wet grass on slopes, disconnect the spark plug or remove the battery, and follow the mower manual. With those habits, blade sharpening becomes a practical part of lawn care rather than a rushed repair.
Affiliate disclosure: This article may contain affiliate links. If you buy a product through one of these links, we may earn a commission at no extra cost to you. Product availability, specifications, compatibility, and prices can change, so confirm details on the manufacturer’s page and in your mower’s owner’s manual before purchasing.


2 Comments