


When you’re ready to tackle your lawn, few things are more frustrating than pulling the mower cord and feeling—nothing. No resistance, no engine rumble, just a lifeless tug. If your lawn mower pull cord is not catching, you’re not alone. This problem happens more often than you might think, and the good news is—it’s almost always fixable with some patience and a few basic tools.
Whether you have a Briggs & Stratton, Honda, Toro, or Craftsman mower, the principles are the same. When the pull cord doesn’t engage, it means the recoil starter isn’t connecting to the flywheel, the part responsible for turning the engine over. This guide breaks down the causes, easy DIY solutions, and long-term maintenance tips to get your mower running again without an expensive trip to the repair shop.
Understanding the Pull Cord Mechanism
Before we jump into repairs, it’s helpful to understand what’s happening under the cover. The pull cord system is simple but clever. When you pull the rope, two small metal arms—called pawls—swing out from the starter assembly and catch onto the flywheel cup. This connection turns the engine fast enough to spark combustion. Once the engine starts or the pull ends, the pawls retract so the flywheel can spin freely.
When your lawn mower pull cord is not catching, it means those pawls never make contact. That could happen because they’re dirty, worn, or jammed. Sometimes, the issue lies with the flywheel cup, the spring tension, or even a misaligned housing. It’s like trying to turn a key in a lock that’s full of sand—the motion is there, but the connection fails.
Why Your Lawn Mower Pull Cord Isn’t Catching
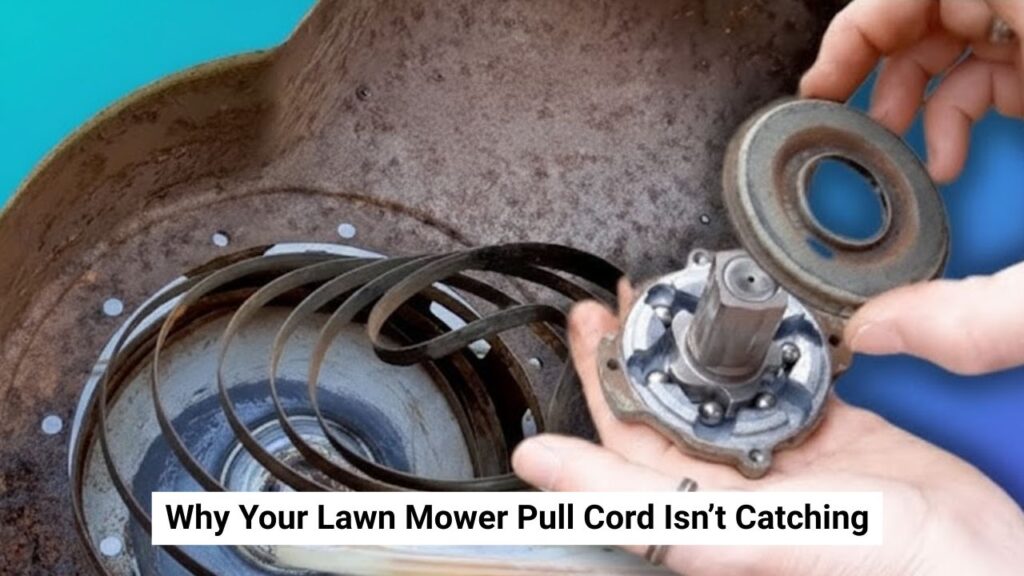
There’s no single reason this happens. Over time, grass dust, rust, and vibration wear down moving parts. Below are the most common causes and what each one means:
| Problem | Description | Difficulty |
|---|---|---|
| Worn or stuck starter pawls | The small arms fail to extend and grab the flywheel cup. | Easy |
| Damaged flywheel cup | The cup’s edges are rounded or filled with dirt. | Medium |
| Weak recoil spring | The cord retracts but lacks enough tension for engagement. | Medium |
| Frayed or tangled pull cord | Rope binds, preventing pawl extension. | Easy |
| Broken pawl springs | Pawls won’t pop out when pulled. | Medium |
| Misaligned recoil housing | After past service, housing may not seat properly. | Easy |
| Sticky lubricant or old grease | Thick grease freezes pawl movement. | Easy |
| Faulty starter clutch (certain models) | Slippage between clutch and flywheel. | Hard |
Each issue gives a slightly different symptom. For example, if the rope rewinds fine but never engages, suspect the pawls or flywheel cup. If the rope won’t rewind at all, the recoil spring or cord routing might be the culprit.
Step 1: Safety First
Before diving in, safety matters. You’re dealing with spring tension and metal components that can snap unexpectedly. Always:
- Disconnect the spark plug wire to prevent accidental starting.
- Work on a cool engine on a flat, clean surface.
- Keep parts organized—label bolts and springs as you remove them.
Taking these steps prevents injuries and makes reassembly much smoother later.
Step 2: Quick Clean and Lube – The Fastest Fix
If your lawn mower pull cord is not catching after storage or a dusty mow, dirt buildup is often to blame. Pawls can stick inside their slots, especially when old grease turns sticky.
How to do it:
- Remove the starter housing.
Most housings have 3–6 bolts on the top or sides. Keep them in order. - Inspect the recoil assembly.
You’ll see the pull cord winding around a circular pulley. Look for the two small pawls beneath or beside the pulley. Try gently pulling the cord—if they don’t extend outward, they’re stuck. - Clean everything.
Use a soft brush or compressed air to clear out dirt, grass, and debris. A rag dampened with alcohol or light degreaser works well. Avoid soaking the assembly. - Lightly lubricate the pawl pivots.
A dry silicone or graphite lubricant works best. Avoid oil or grease—it traps more dirt. - Inspect the flywheel cup.
Check the inner surface for rounded edges or caked grass. Clean it thoroughly but leave it dry; lubrication here reduces friction and prevents catching. - Test engagement.
Place the housing back temporarily, pull the rope, and watch if the pawls now catch. If it grips firmly, reinstall everything securely.
This simple cleaning process fixes about half of all cases where the pull cord doesn’t catch. It’s fast, safe, and doesn’t cost anything.
Step 3: Replacing Worn Pawls or a Damaged Flywheel Cup
If cleaning didn’t solve it, worn parts are next on the list. The pawls (also called “dogs”) and flywheel cup experience constant friction. Over time, they round off or crack, making engagement unreliable.
How to diagnose:
- Pawls look shiny, rounded, or loose.
- Pawl springs are weak or broken.
- Flywheel cup shows smooth wear marks or chipped edges.
Repair Steps:
- Remove the starter housing again.
- Take out the old pawls by removing their retaining clips or screws.
- Install new pawls and springs—ideally OEM parts for your engine brand.
- Inspect the flywheel cup. If it’s damaged, remove its central bolt using a strap wrench or safely blocking the blade.
- Replace the cup and torque the bolt to manufacturer specs (usually 35–55 ft-lbs).
- Reassemble everything and test the pull cord.
You should feel a strong, solid grab when you pull. This repair typically costs under $25 in parts and takes about an hour.
Step 4: Servicing the Recoil Assembly (Rope and Spring)
Sometimes the pawls work fine, but the rope doesn’t extend or retract properly. If the rope retracts but still doesn’t engage, it’s often due to poor spring tension or a frayed cord.
Symptoms to look for:
- Rope hangs loose or retracts weakly.
- Rope binds midway.
- Pawls extend only partially.
Fix Steps:
- Remove the recoil housing and inspect the rope. If it’s frayed, stiff, or too short, replace it.
- Use the correct size—most mowers use 3/16-inch (about 4.5 mm) rope.
- If the recoil spring feels weak or broken, remove the pulley carefully.
- Clean the spring, apply a light coat of dry lubricant, and rewind it 5–7 turns for tension.
- Rethread the rope through the pulley and housing guide, tie a secure knot, and melt the end lightly to prevent fraying.
- Reinstall the handle and check smooth retraction.
This fix requires patience—especially handling the recoil spring—but it restores both tension and reliability to the starting system.
Step 5: Checking the Starter Clutch or One-Way Mechanism
On some mowers, especially higher-end or older ones, a starter clutch sits between the pull mechanism and flywheel. If it’s slipping or seized, even a perfect recoil system won’t turn the engine.
How to identify the issue:
- Pawls extend normally, but the engine doesn’t turn.
- You hear a faint grinding or slipping sound near the crankshaft.
Fix:
- Remove the flywheel cup and locate the clutch.
- Clean it with a non-residue cleaner like carb or brake cleaner.
- Inspect for wear or scoring. If damaged, replace it—most are sealed units and not serviceable.
Once reinstalled, a healthy clutch gives a solid feel when you pull, turning the engine immediately.
Preventing Future Pull Cord Problems
Fixing your mower is one thing—keeping it that way is another. Most issues happen because dirt, moisture, and neglect creep in over time. Here are simple prevention tips to make sure your lawn mower pull cord doesn’t stop catching again:
- Clean after mowing: Blow out the starter housing with compressed air or a brush after each use.
- Use only dry lubricants: Silicone or graphite prevents sticking without attracting dirt.
- Replace the rope yearly: Especially if you mow often or store outdoors.
- Store indoors: Moisture rusts pawls and causes spring fatigue.
- Pull smoothly: A steady, full-length pull engages the mechanism better than short jerks.
- Seasonal inspection: Before the mowing season starts, inspect the pawls, springs, and rope for wear.
Quick Reference Checklist:
| Task | Frequency | Benefit |
|---|---|---|
| Clean starter housing | After each mow | Prevents dust buildup |
| Check rope condition | Monthly | Avoids fray or binding |
| Replace rope | Once a year | Ensures smooth operation |
| Inspect pawls/springs | Every season | Prevents failure mid-mow |
Following these steps ensures your mower starts reliably season after season.
Pro Tips for Easier Repairs
If you’ve never worked on a mower before, don’t worry—these practical tips will help:
- Take photos as you go. Each step helps during reassembly.
- Label your bolts. Some housings use different lengths. Mixing them can crack the plastic.
- Check the blade brake. If the brake is stuck, it can feel like the pull cord isn’t catching when the engine’s just locked.
- Always test engagement before final assembly. Saves time if further adjustment is needed.
- Avoid heavy grease. It gums up in cold weather and causes sticking pawls.
Even small details—like cleaning out the flywheel cup regularly—make a huge difference in preventing failure.
When to Call a Professional
Sometimes, even after replacing pawls, rope, and springs, your lawn mower pull cord still won’t catch. That’s your cue to consider a mechanic. Certain repairs—like removing the flywheel clutch or replacing stripped housing posts—require tools and precision torque you might not have.
Seek professional help if:
- The recoil spring breaks repeatedly.
- The starter housing is cracked or stripped.
- The engine won’t turn even when the cord engages (possible hydro-lock or seized engine).
- Engagement still slips after new parts.
Typical repair costs:
| Part | Cost (USD) |
|---|---|
| Pawl kit | $8–$25 |
| Recoil rope and handle | $6–$15 |
| Recoil spring or cartridge | $15–$40 |
| Flywheel cup or clutch | $10–$40 |
| Professional labor | $50–$120 |
Having a professional fix the issue once may save you time, frustration, and repeated disassembly attempts.
Warranty and Manufacturer Considerations
Before tearing your mower apart, it’s worth checking your warranty status. Many lawn mowers, especially newer models from Honda, Toro, Craftsman, or Briggs & Stratton, come with a 2–3-year limited warranty. The recoil starter system often falls under “user-serviceable parts,” meaning you can clean or replace it without voiding coverage. However, it’s always smart to double-check your manual or contact the manufacturer first.
If your lawn mower pull cord not catching issue happens within the warranty period, a certified repair center can often handle it for free. Keep your purchase receipt and model number handy. Most service centers can replace pawls, flywheel cups, or recoil assemblies under warranty as long as there’s no visible abuse or modification.
For older mowers, though, doing it yourself is often faster and cheaper. The key is patience and methodical work—never rush the recoil spring reinstallation, and always torque flywheel bolts properly. That’s how you avoid bigger issues later, like stripped threads or misalignment.
Advanced Troubleshooting: When the Basics Don’t Work
Sometimes you clean, lubricate, and replace the obvious parts, but the pull cord still won’t catch. When that happens, the issue may lie deeper in the engine assembly or crankshaft connection. Here are some advanced possibilities and how to identify them:
- Crankshaft damage or misalignment:
If your mower hit a rock or thick root, it may have slightly bent the crankshaft. This can cause the flywheel to sit unevenly, preventing the pawls from aligning correctly. To test, remove the spark plug and rotate the blade manually. Any wobble or uneven resistance points to alignment issues—best handled by a professional. - Starter clutch malfunction:
On mowers with a centrifugal clutch, the rollers can wear or seize. You might hear a grinding or whining sound when pulling. These clutches are often sealed and need full replacement. - Hydro-lock:
If you left your mower tilted or overfilled with oil, fluid can enter the cylinder, locking the piston. The pull cord feels like it won’t engage because the engine physically can’t move. Remove the spark plug, pull the rope gently to expel fluid, clean the plug, and try again. - Blade brake engagement:
If your mower has a blade brake lever, ensure it’s fully disengaged before pulling. A stuck brake feels like a non-catching cord because it holds the flywheel still.
When you’ve exhausted these checks, it’s usually worth letting a repair shop evaluate the starter assembly and crankshaft. The cost is modest compared to replacing an engine—or worse, a whole mower.
Alternative Fixes and Upgrade Options
If you’re tired of wrestling with pull cords altogether, there are alternatives that make life easier. Depending on your mower’s model, you might have options like electric start conversions or complete recoil replacements. Let’s compare:
| Solution | Pros | Cons | Ideal For |
|---|---|---|---|
| Electric Start Kit | Push-button convenience, no pulling required | Added cost, battery upkeep | Users with physical limitations or frequent starts |
| Complete Recoil Assembly Replacement | Restores brand-new operation | Slightly more costly than part-by-part fix | Starters with worn housings or unknown condition |
| Professional Service | Guaranteed fix and warranty | Labor cost and downtime | People short on tools or experience |
| New Mower Purchase | New warranty and efficiency | Highest cost | Very old or heavily worn machines |
For most DIYers, replacing the entire recoil starter assembly is the sweet spot between effort and reliability. It costs around $25–$60 and bolts directly on in minutes. It’s also a great way to reset the mechanism without guessing which part’s worn out.
Tips for Longevity and Smoother Starting
Keeping your lawn mower pull cord catching properly is less about constant fixing and more about small, consistent habits. Think of it like dental care for your mower—little cleanings prevent painful repairs. Here are some long-term habits that make a difference:
- Wipe and inspect after every mow. Remove dust, grass, and sap buildup near the recoil housing.
- Replace ropes before failure. Don’t wait for frays; swap the pull cord every season or two.
- Keep bolts snug. Loose recoil housing bolts lead to misalignment, which affects pawl engagement.
- Avoid over-lubrication. The cleaner and drier the mechanism, the longer it lasts.
- Store vertically or indoors. Keeping it dry protects the spring tension and pawl springs from rust.
- Start gently but firmly. A smooth, full pull ensures proper engagement without unnecessary strain.
Following these habits keeps your mower starting easily year after year—and saves you from sweaty frustration on a hot summer morning.
DIY vs Professional Repair: What’s Really Worth It?
If you enjoy fixing things, tackling a lawn mower pull cord not catching issue can be a satisfying DIY project. It teaches you about your engine, builds confidence, and costs very little. However, if you find yourself repeatedly opening the starter housing or the recoil spring keeps popping loose, it might be time to call a professional.
DIY repair makes sense when:
- You only need cleaning, lubrication, or a new rope/pawl.
- You have a basic socket set and screwdrivers.
- You’re comfortable handling spring tension.
Professional repair is smarter when:
- The starter housing is cracked or warped.
- The flywheel or crankshaft needs alignment.
- You suspect internal engine damage.
- The repair requires torque tools or pullers.
In most cases, a small engine repair shop can diagnose and fix this in under an hour. The average labor rate ranges between $50–$120, depending on where you live.
Frequently Asked Questions (FAQs)
1. Why does my lawn mower pull cord pull freely without any resistance?
That usually means the starter pawls aren’t engaging with the flywheel cup. They may be stuck with old grease or worn down from years of use. Remove the starter housing, clean the pawls and flywheel, and check for wear. Replacing both together gives a long-term fix.
2. The pull cord rewinds fine, but the engine doesn’t turn—what’s wrong?
When the cord retracts normally but doesn’t spin the engine, the flywheel cup or clutch is likely the problem. The pawls might extend, but if the flywheel’s teeth are rounded or the clutch is slipping, it won’t catch properly.
3. Can I use WD-40 to lubricate the recoil starter?
You can use WD-40 as a cleaner, but not as a lubricant. After cleaning, apply a dry silicone or graphite lube to prevent sticking without attracting dust. Heavy oils cause gumming, especially in cold weather.
4. How tight should I wind the recoil spring when reassembling?
Most mower recoil springs work best when preloaded five to seven turns before installing the rope. Too loose and it won’t rewind fully; too tight and it risks snapping. Follow your specific model’s service manual for exact guidance.
5. What size pull cord should I use for replacement?
Most walk-behind mowers use 3/16-inch (4.5–5 mm) rope. However, some smaller engines (like compact push mowers) use 1/8-inch. Always match your old cord’s thickness and length to ensure proper winding and reach.
6. My pull cord catches sometimes but slips other times—what does that mean?
Intermittent catching often means worn flywheel cups or weak pawl springs. As the parts heat or shift slightly during use, engagement becomes inconsistent. Replacing both components at once ensures reliable catching.
7. Do I need to remove the mower blade to fix the pull cord?
Usually no, unless you’re replacing the flywheel cup or clutch and need to lock the blade to prevent rotation while loosening bolts. Always disconnect the spark plug before touching the blade.
8. Is it safe to work on the recoil starter at home?
Yes—just proceed carefully. Always disconnect the spark plug wire first. The only tricky part is handling the recoil spring. It’s under tension, so wear gloves and eye protection when removing or reinstalling it.
Real-Life Example: A 20-Minute Fix That Saved $80
To put this in perspective, here’s a quick real-world example. One weekend, my old Briggs & Stratton mower refused to start. The pull cord spun freely like a broken toy. After removing the top cover, I found both pawls stuck with dry grass and sticky grease. Ten minutes with a toothbrush and silicone spray, and they snapped back like new. Reassembled everything—and it started on the first pull.
If I had taken it to a shop, the repair would’ve cost at least $80 in labor. Sometimes, all your mower needs is a little cleaning and common sense. That’s the beauty of understanding how these machines work.
When All Else Fails: Consider an Upgrade
If your mower is over a decade old and parts are wearing faster than you can replace them, it might be time to think long-term. Modern mowers often feature auto choke systems, electric start buttons, and sealed recoil assemblies that prevent dust buildup entirely.
Upgrading can also improve efficiency and fuel economy. If you’re replacing an older gas mower, you might even explore battery-powered models—they’re quieter, easier to start, and require almost no maintenance. While the upfront cost is higher, the convenience is unbeatable.
Common Mistakes to Avoid During Repair
Even experienced DIYers make errors when fixing a lawn mower pull cord not catching issue. Here are some to watch for:
- Over-lubing: Thick oil clogs pawls and attracts dust.
- Wrong rope routing: Threading through the wrong eyelet leads to poor retraction.
- Skipping spring tensioning: Insufficient preload causes the cord to hang loose.
- Mixing bolt lengths: Tightening a long bolt into a short hole can crack plastic housings.
- Ignoring the flywheel cup: Many people clean the pawls but forget the cup—it’s half the engagement equation.
Take your time, document the disassembly with your phone, and double-check part diagrams online. A little patience goes a long way.
Quick Reference: Troubleshooting Summary
| Symptom | Likely Cause | DIY Solution | Difficulty |
|---|---|---|---|
| Cord pulls freely | Stuck or worn pawls | Clean or replace pawls | Easy |
| Cord rewinds but engine doesn’t turn | Worn flywheel cup | Replace flywheel cup | Medium |
| Cord doesn’t rewind | Weak or broken spring | Rewind or replace recoil spring | Medium |
| Cord catches sometimes | Weak pawl springs | Replace pawl springs | Easy |
| Cord pulls tight, engine doesn’t move | Seized brake or hydro-lock | Check brake lever, remove spark plug | Medium |
| Grinding sound during pull | Slipping clutch | Replace starter clutch | Hard |
Use this chart as your go-to reference when diagnosing similar problems in the future.
Final Thoughts: Get Your Mower Running Again
A lawn mower pull cord not catching isn’t a death sentence for your mower—it’s a mechanical hiccup that’s usually easy to fix. Whether it’s stuck pawls, a dirty flywheel cup, or a tired recoil spring, most repairs require just a screwdriver, a clean workspace, and about an hour of your time.
