


Nothing ruins a peaceful Saturday morning faster than pulling your Honda lawn mower’s starter cord and realizing the blade isn’t engaging. The engine might hum beautifully, but the grass stays tall. You squeeze the handle again, expecting the familiar whirl of the blade—and still nothing. Frustrating, right?
If your Honda lawn mower blade is not engaging, you’re not alone. This issue happens to many Honda owners, especially on popular models like the HRX217, HRR216, or HRS216. The good news? It’s often something simple: a loose cable, a sticky clutch, or a worn belt. Before rushing to the repair shop, you can diagnose and fix this yourself with basic tools and a little patience.
In this detailed guide, we’ll walk through all the possible reasons your Honda mower blade won’t engage—and exactly how to fix them. You’ll learn to check the blade control cable, clean the clutch area, replace parts if needed, and even prevent it from happening again. Let’s get your mower cutting grass again like it was built to.
Understanding How the Honda Blade Engagement System Works
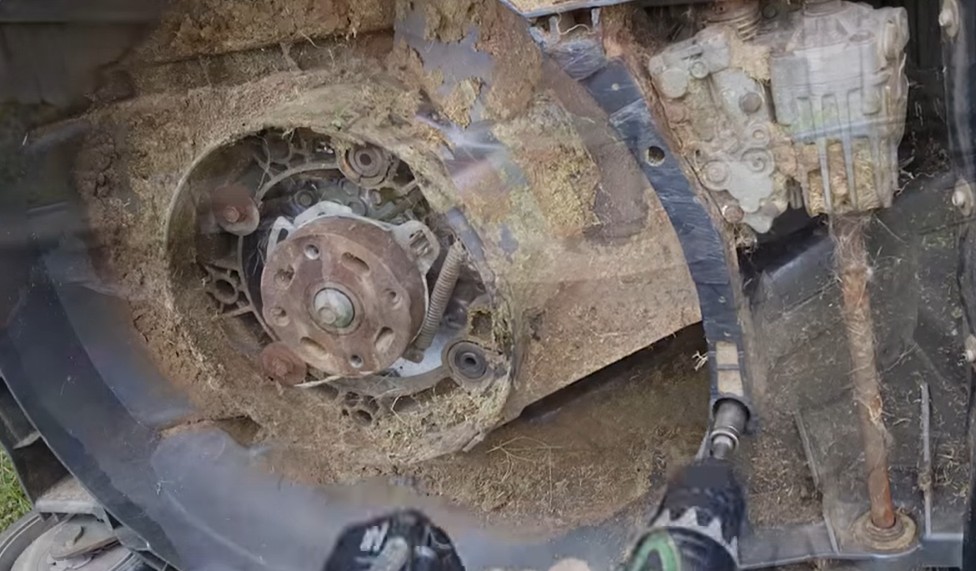
To fix any problem, it helps to know how it works. Honda’s mowers are famous for their precision engineering, and their blade engagement system is no exception. Depending on your model, Honda uses one of two main systems:
- Basic Cable-and-Brake System – Common on entry-level models like the HRS216. The handle lever (also called the bail) connects to a cable that pulls on a brake arm, which releases the brake and engages the blade directly.
- Roto-Stop or BBC (Blade Brake Clutch) System – Found on higher-end models like the HRX and HRR series. This advanced setup lets you stop the blade while keeping the engine running—perfect for moving obstacles without shutting off the mower.
When the blade control lever is squeezed, it pulls on the blade control cable, which either releases the brake pad or activates the clutch. When released, the brake pad stops the blade within seconds—a crucial safety feature.
But if that system fails—due to a stretched cable, stuck clutch, or worn belt—the blade simply won’t engage. Let’s dive into what could be happening.
Common Reasons Why Your Honda Lawn Mower Blade Isn’t Engaging
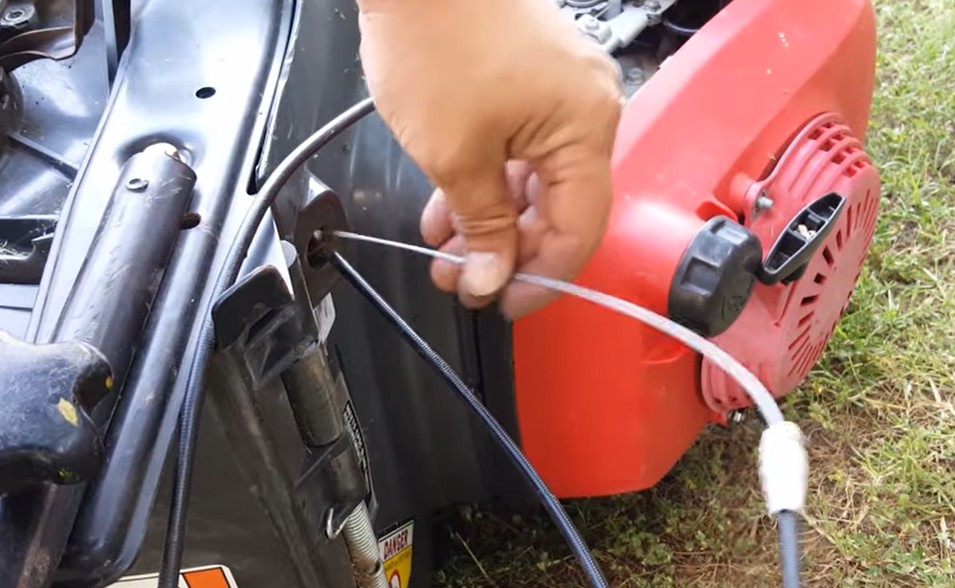
If your Honda mower blade won’t spin, the problem could stem from a variety of small issues. Here are the most common culprits and what they mean for your mower:
| Cause | Symptoms | Difficulty |
|---|---|---|
| Loose or stretched blade control cable | Bail feels slack or unresponsive | Easy |
| Debris around clutch or belt | Blade won’t spin; burning smell | Easy |
| Worn or broken belt | Blade spins slowly or not at all | Moderate |
| Sticky clutch mechanism | Delayed engagement or squeal | Moderate |
| Low engine speed | Blade engages only at high throttle | Easy |
| Faulty BBC/Roto-Stop clutch | Blade won’t engage even with tension | Hard |
| Safety interlock not set | Blade won’t start after releasing lever | Easy |
Every issue starts small but worsens over time. For example, a slightly stretched cable might seem harmless until it can no longer pull the clutch arm far enough. Or, grass buildup under the deck may start as minor resistance and eventually jam the blade. That’s why it’s important to address these signs early.
Step 1: Start with the Simple Checks
Before you grab your tools, let’s do some easy visual and manual inspections. Sometimes, the fix is right in front of you.
1. Make sure the bail lever is fully engaged:
Hold the blade control handle firmly against the upper handle. It should feel tight and springy. If it feels loose or sloppy, that’s a clear sign your cable is stretched or disconnected.
2. Check for cable tension:
Follow the cable from the handle down to the mower deck. You’ll usually see a metal arm or linkage that moves when the handle is squeezed. If it barely moves—or doesn’t move at all—the cable likely needs adjustment.
3. Inspect for visible damage:
Cracked cable housings, rusted springs, or loose clamps can all prevent full engagement. Even minor corrosion can stiffen the linkage enough to stop the clutch from releasing.
4. Clear debris under the deck:
Tilt the mower (air filter and carburetor facing up). Look under the deck for caked grass or twigs around the blade hub or clutch housing. This buildup can block the clutch from engaging or cause slippage.
Doing these quick checks can often save you a trip to the repair shop. If nothing obvious stands out, move on to the next step.
Step 2: Adjusting the Blade Control Cable
A loose or stretched control cable is by far the most common reason your Honda lawn mower blade won’t engage. Luckily, adjusting it is simple.
- Safety first: Turn off the engine and disconnect the spark plug wire.
- Locate the adjuster: Most Honda models have a small barrel-style adjuster near the handle where the cable runs.
- Tighten the cable: Loosen the lock nut and turn the adjuster to increase cable tension. You’ll notice the cable pulling tighter.
- Test the travel: Squeeze the bail lever—if the cable now moves the clutch arm firmly and the handle feels more responsive, you’re on the right track.
- Avoid over-tightening: Too much tension can keep the brake slightly released, wearing out the clutch.
After adjustment, reconnect the spark plug wire and start the mower. Pull the bail lever to engage the blade. If it spins smoothly and stops within three seconds after releasing, you’ve fixed the problem. If not, the issue may lie deeper—inside the clutch or belt system.
Step 3: Cleaning the Clutch and Belt Area
Sometimes, the reason your Honda lawn mower blade is not engaging is simply that the clutch or belt mechanism is clogged with dirt. Over time, damp grass and dust accumulate under the deck, wrapping around pulleys or drying into a sticky paste that locks the parts.
Here’s how to clean it properly:
- Disconnect the spark plug wire and wear gloves.
- Tilt the mower carefully, keeping the carburetor and air filter facing up to prevent leaks.
- Scrape off caked grass with a plastic scraper or brush. Don’t use metal tools that could damage the deck or pulleys.
- Remove the belt cover (on HRR and HRX models) to access the clutch and belt.
- Clean pulleys and belts using a dry cloth. Avoid solvents—they can damage rubber belts.
- Check the blade movement by spinning it with a gloved hand. It should rotate smoothly without sticking or grinding.
Once the area is clean, reassemble the cover and test the mower. In many cases, simply clearing debris restores full engagement.
Step 4: Replacing a Damaged or Stretched Cable
If adjusting didn’t fix the issue, it’s time to replace the cable entirely. Cables stretch with time, especially if your mower has seen several mowing seasons.
To replace:
- Identify your mower model (like Honda HRX217VKA or HRR216PKA) and order a matching OEM cable. Genuine Honda parts fit perfectly and last longer than aftermarket ones.
- Remove the old cable by unhooking it from both ends—the handle bail and the clutch arm near the deck.
- Route the new cable along the same path, clipping it into the guides.
- Adjust tension using the same method as before.
- Test engagement again.
A fresh cable often makes a dramatic difference. The bail lever will feel crisp, the clutch will engage faster, and the blade will respond instantly.
Step 5: Checking the Blade Brake Clutch or Roto-Stop System
If you own a higher-end Honda with Roto-Stop (BBC), the problem could lie within the clutch assembly itself. This system uses a mechanical clutch to engage or disengage the blade without shutting off the engine.
Here’s what might go wrong:
- Worn clutch plates that slip under load.
- Weak clutch spring that fails to hold pressure.
- Brake pad stuck against the hub, preventing rotation.
- Contaminated surfaces from oil or moisture.
These symptoms often include squealing noises, burning smells, or the blade starting and stopping intermittently. Unfortunately, BBC systems are more complex to service.
If you have the tools and mechanical confidence, you can remove the clutch housing and inspect the components for wear. However, most homeowners prefer taking it to a Honda-authorized service center for this type of repair. It ensures the clutch is realigned and torqued to factory specs—vital for both safety and performance.
Step 6: Don’t Forget the Belt
For belt-driven models, the blade drive belt plays a crucial role in transferring power from the engine to the blade. When worn, cracked, or glazed, it can slip and prevent the blade from engaging fully.
Signs of a failing belt include:
- Blade spins slowly or takes a few seconds to start.
- A burning rubber smell after engaging.
- Visible cracks or fraying on the belt edges.
- Belt slipping off pulleys during operation.
How to Prevent Your Honda Lawn Mower Blade from Failing to Engage Again
Fixing your mower is one thing. Keeping it running smoothly for years is another. Luckily, preventing the Honda lawn mower blade not engaging problem is much easier than you might think. Regular upkeep takes only a few minutes after each mowing session and can save hours of frustration later.
Here’s a simple maintenance checklist that works wonders:
- Clean the deck after every mow: Grass clippings collect around the blade and clutch area, trapping moisture that leads to corrosion and stiffness.
- Inspect the control cable monthly: If it starts feeling soft or shows signs of rust, lubricate it immediately.
- Keep the pulleys and belt clean: A thin layer of dust or grease can make a belt slip.
- Run the mower at full throttle during engagement: Engaging the blade at low RPM causes clutch slippage, which wears out the clutch faces and belt faster.
- Store the mower in a dry garage or shed: Humidity and cold weather can make cables seize up.
Think of your mower like a car—you wouldn’t drive without checking oil and tires. The same mindset applies here. A little post-mow maintenance keeps your Honda reliable for every season.
Signs It’s Time to Replace More Than Just the Cable
Sometimes the blade engagement issue goes beyond a cable or belt. If your mower has several seasons under its belt (pun intended), some deeper wear could be at play. Here’s how to tell when it’s time for bigger repairs:
- The bail lever feels firm, but the blade still doesn’t move.
This often means the clutch assembly is worn out. The internal pads or springs can weaken with age. - You hear a grinding or squealing noise during engagement.
This usually points to slipping clutch plates or dry pulleys. - The blade spins but stops mid-mow.
A loose belt or damaged idler pulley could be losing tension when the mower heats up. - Blade continues spinning after releasing the handle.
This is a major safety issue and indicates the brake mechanism inside the BBC isn’t working.
If any of these occur, it’s best to stop mowing and inspect or replace the affected parts. Continuing to run the mower can damage the engine crankshaft or clutch permanently.
Step-by-Step: Testing the Blade After Repair
Once you’ve adjusted, cleaned, or replaced parts, testing your mower safely is essential. Here’s the proper way to confirm your fix:
- Reconnect the spark plug wire and start the engine.
- Set the throttle to FAST. Many Honda systems only engage properly at full engine speed.
- Pull the blade control lever.
- The sound should change immediately as the blade spins up.
- There should be no grinding or squealing.
- Release the lever.
- The blade should stop within three seconds. If it doesn’t, the brake system needs adjustment.
Perform this test twice. Once standing still and again while cutting a small patch of grass. Smooth engagement and clean cutting mean your mower is working like new again.
Professional Help: When DIY Isn’t Enough
There comes a point when home troubleshooting reaches its limit. If your Honda lawn mower blade still won’t engage after replacing the cable or cleaning the clutch area, you might need professional help.
Here’s when to call a technician:
- The blade control lever moves freely, but nothing happens below the deck.
- You smell burning rubber or notice smoke from the clutch area.
- The blade doesn’t stop quickly when released (safety hazard).
- You hear a metal-on-metal grinding or clicking sound.
- You find oil contamination on the clutch or belt (a possible crankshaft seal leak).
Choosing the right service provider matters. Look for a Honda-certified repair shop—they have access to genuine parts, correct torque specs, and model-specific knowledge. Ask for a written estimate and a brief explanation of what failed before they begin.
Typical repair costs (parts + labor):
| Service Type | Estimated Cost Range |
|---|---|
| Cable replacement | $40 – $110 |
| Belt replacement | $60 – $140 |
| BBC clutch replacement | $120 – $300+ |
| Pulley or idler repair | $50 – $90 |
While it may seem pricey, using genuine Honda parts guarantees safety and long-term reliability. Cutting corners with generic parts often leads to more repairs later.
Pro Tips to Keep Your Honda Mower Performing Like New
If you love your Honda mower, treat it with the same care it gives your lawn. These pro tips will keep the blade engagement system working perfectly year after year.
- Engage the blade at full throttle. This ensures smoother clutch contact and prevents premature belt wear.
- Never overtighten the control cable. Too much tension can keep the brake partially released, burning out the clutch pad.
- Lubricate moving parts. Once a month, add a drop of light oil to the clutch arm pivot and the bail lever joint.
- Inspect the belt mid-season. Especially if you mow in damp conditions—wet grass can cause belt glazing.
- Use only genuine Honda parts. Belts, cables, and clutches are engineered for precise tension. Off-brand replacements rarely align perfectly.
- Avoid impacts. Hitting rocks or roots can bend the blade shaft and damage the clutch hub.
- Torque the blade bolt correctly. For most Honda models, tighten between 36–43 ft-lb (check your manual). A loose blade can mimic clutch problems.
Following these habits turns your mower from a seasonal headache into a dependable workhorse.
Safety Always Comes First
When working around mower blades, there’s no such thing as being “too careful.” Always disconnect the spark plug wire before touching the blade or belt. For electric-start models, disconnect the battery cable too. Use gloves, and tilt the mower so the air filter faces upward to avoid leaks.
Never test the blade engagement by hand or near moving parts. Wait for all motion to stop before adjusting or checking tension. These small steps prevent serious injuries and protect your mower from damage.
How to Identify a Bad Honda Roto-Stop (BBC) Clutch
If your mower uses the Honda Roto-Stop system and the blade still won’t engage even after all adjustments, your clutch might be failing. Here’s how to confirm it:
- The engine runs fine, but the blade doesn’t spin even when the bail lever is fully squeezed.
- You notice burning smells or feel vibration when the clutch tries to engage.
- The blade starts and stops intermittently, especially under load.
- The blade doesn’t stop immediately when released.
A bad Roto-Stop clutch means the friction plates have worn out or the return spring is weak. Unfortunately, this component isn’t serviceable—it must be replaced as a whole unit. Honda recommends professional installation since it requires proper torque settings and alignment.
If replaced correctly, a new clutch can restore near-factory performance and safety.
Avoid These Common Mistakes
Many owners unknowingly make small errors that cause or worsen the Honda lawn mower blade not engaging issue. Watch out for these mistakes:
- Engaging at low RPM: Causes slipping and clutch glazing.
- Storing outdoors: Moisture rusts cable ends and stiffens springs.
- Overtightening cable adjuster: Burns out the clutch or keeps the brake half-released.
- Using the wrong belt size: Non-OEM belts often ride too high in pulleys, causing constant slip.
- Ignoring grass buildup: A few clippings can turn into a solid blockage over time.
Avoiding these habits will make your mower smoother, safer, and longer-lasting.
Long-Term Maintenance Plan
Here’s a simple maintenance plan to keep your mower in top shape all year:
| Maintenance Task | Frequency |
|---|---|
| Check cable tension | Every 25 hours of use |
| Clean under the deck | After every mow |
| Lubricate linkage points | Every 2–3 weeks |
| Inspect belt and pulleys | Each season |
| Replace blade belt | Every 2–3 years |
| Check clutch/brake function | Start of each season |
Following this schedule makes sure you’ll rarely face the Honda mower blade not engaging issue again.
FAQs About Honda Lawn Mower Blade Not Engaging
Q1: Why does my Honda mower engine run, but the blade doesn’t spin?
A: Most likely, the blade control cable is stretched, disconnected, or binding. Check for cable movement when you squeeze the handle. If it’s fine, look for debris blocking the clutch or a worn belt.
Q2: My mower’s blade spins slowly or stops mid-cut. What’s wrong?
A: That’s a sign of a slipping belt or clutch. Inspect the belt for cracks and check that the clutch faces are clean and dry.
Q3: How can I tell if my Roto-Stop clutch is failing?
A: If you hear a squealing sound, smell burning, or the blade takes several seconds to start or stop, the clutch is likely worn and needs replacement.
Q4: Can I adjust the clutch itself?
A: No. You can only adjust the blade control cable. The clutch assembly is factory-sealed and must be replaced if worn.
Q5: Is it normal for the blade to engage only at high throttle?
A: Yes, to an extent. Honda designs the clutch to engage cleanly at full engine speed. However, if it requires unusually high RPM, check the cable tension or belt condition.
Q6: My blade doesn’t stop immediately when I release the handle—what now?
A: Stop using the mower. The brake system isn’t functioning correctly. Adjust the cable or have a technician inspect the brake pad.
Q7: How often should I replace the blade control cable?
A: Typically every 3–4 years, depending on usage and climate. Frequent exposure to moisture or long storage periods may shorten its life.
Alternative Options When Repairs Aren’t Worth It
If your mower is older and repair costs exceed half its value, replacing it might be the smarter move.
Option 1: Upgrade to a new Honda model without BBC – simpler design and fewer parts to maintain.
Option 2: Opt for another Roto-Stop model if you value the convenience of stopping the blade without killing the engine.
Option 3: Enroll in a seasonal service plan with a local shop—they’ll handle tune-ups, belt replacements, and safety checks for you.
For light-duty users who mow occasionally, buying a new unit may even save money long-term compared to constant part replacements.
Wrapping It Up: Get Your Honda Mower Cutting Again
By now, you know every reason why your Honda lawn mower blade is not engaging—and exactly how to fix it. Whether it’s a stretched cable, dirty clutch, or worn belt, the key is understanding how each part connects to the blade system.
Start with the simplest steps: check the cable tension, clean the clutch area, and inspect the belt. If those don’t solve it, move toward part replacement or professional service. Every fix brings you closer to that smooth, crisp engagement Honda mowers are known for.
Best Batteries for John Deere S120 Lawn Mower in 2025
When it comes to finding the perfect replacement battery for your John Deere S120 lawn mower, quality and compatibility are everything. The right battery ensures consistent power, longer runtime, and reliable starts every mowing season. Below are five of the best batteries for the John Deere S120 in 2025—carefully selected for performance, durability, and value.
1. ExpertPower 12V 35Ah Rechargeable Battery
The ExpertPower 12V 35Ah is a highly reliable AGM deep-cycle battery that’s a perfect match for the John Deere S120. Its compact design fits most riding mower compartments without modifications. The sealed lead-acid (SLA) technology ensures spill-proof operation and requires zero maintenance.
What really sets this battery apart is its long service life and vibration resistance. The heavy-duty construction prevents internal damage during bumpy rides across uneven lawns. Moreover, it delivers consistent voltage output, which translates into smoother mower performance and dependable starts—even after long storage periods.
For homeowners who mow weekly or seasonally, the ExpertPower 12V 35Ah offers unbeatable value and longevity. It’s also compatible with other lawn equipment, making it a versatile investment.
2. Mighty Max ML-U1-35 Deep Cycle AGM Battery
Mighty Max batteries are well-known for their dependability, and the ML-U1-35 is no exception. Designed with AGM technology, it provides high current output, quick recharge cycles, and superior resistance to heat and vibration.
For the John Deere S120, this battery fits perfectly in the U1-size slot. The maintenance-free design eliminates the hassle of adding water, and the sealed casing prevents leaks even when tilted. The ML-U1-35 is also built to perform in both hot and cold weather, ensuring your mower starts reliably in spring and fall.
Another major advantage is its long lifespan. With proper care and a smart charger, you can expect this battery to last 3–5 years or more. It’s a trusted choice for both casual and commercial mowing applications.
3. Weize 12V 35Ah Deep Cycle Battery
If you want a high-capacity battery that can handle heavy-duty mowing, the Weize 12V 35Ah is a smart choice. Its powerful output and durable plates provide excellent energy storage, meaning your S120 will run longer and more efficiently.
The Weize battery uses absorbent glass mat (AGM) separators, which trap electrolytes and enhance conductivity. This results in consistent power delivery and low internal resistance. It’s also maintenance-free, corrosion-resistant, and environmentally safe.
What makes the Weize 12V 35Ah stand out is its balance between price and performance. You get a strong, long-lasting battery at a fraction of the cost of OEM replacements. Many John Deere owners report that it performs just as well—or better—than the factory battery.
4. Chrome Battery 12V 35Ah U1R Sealed Lead Acid Battery
The Chrome 12V 35Ah battery is designed for users who value easy installation and reliable output. It’s compatible with the John Deere S120 and other riding mowers that use U1R terminals.
This battery is factory-activated and ready to use right out of the box. Its sealed AGM construction prevents leaks, while the durable outer casing resists vibration and impact. The internal grid design allows for fast charging and consistent current flow, which helps your mower start quickly, even after long idle periods.
In terms of longevity, the Chrome Battery performs well under regular lawn care usage. It offers up to 500 recharge cycles and maintains a steady performance level even after months of inactivity.
5. Interstate Batteries 12V 35Ah SLA Replacement Battery
Interstate Batteries has been a trusted brand in power solutions for decades, and their 12V 35Ah SLA battery continues that tradition. It’s engineered for reliability and performance, with superior energy density and rugged build quality.
This battery provides clean, efficient power to your John Deere S120’s electrical system. The tight-sealed design prevents spills, and its internal plates are designed to reduce sulfation—one of the main causes of battery failure.
Another highlight is its excellent cold-cranking performance. Whether you store your mower in a cold garage or shed, the Interstate 12V 35Ah ensures you won’t struggle to start it next season. It’s a strong contender for those who prioritize brand reputation and durability.
Buying Guide: How to Choose the Right Battery for Your John Deere S120
Selecting the best battery for your S120 isn’t just about matching voltage—it’s about ensuring optimal performance and lifespan. Below are key factors to consider before buying:
1. Battery Type (AGM vs. Flooded Lead Acid)
AGM (Absorbent Glass Mat) batteries are the modern standard for riding mowers. They are spill-proof, maintenance-free, and vibration-resistant. Flooded lead-acid batteries are cheaper but require water refills and careful handling. For convenience and safety, AGM batteries are the preferred choice for the S120.
2. Voltage and Capacity
The John Deere S120 uses a 12-volt battery, typically rated at 35Ah (amp-hours). Always match these specifications to avoid damaging the mower’s electrical components or starter motor.
3. Terminal Position and Size
The S120 generally uses a U1R type battery, where the positive terminal is on the right. Double-check your old battery before purchasing to ensure a proper fit and easy installation.
4. Cold Cranking Amps (CCA)
CCA determines how well a battery starts in cold conditions. For the John Deere S120, a CCA rating between 280–350 is ideal. Higher CCA ratings ensure reliable starting even in low temperatures.
5. Maintenance and Longevity
Look for sealed, maintenance-free batteries that can last at least three years with proper care. AGM models typically outlast traditional lead-acid types and require minimal attention.
Battery Maintenance Tips for John Deere S120 Owners
Even the best battery won’t last forever—but you can extend its life significantly with proper care. Follow these maintenance tips to get the most out of your investment:
1. Keep Terminals Clean
Corrosion buildup on battery terminals can reduce power transfer. Use a mixture of baking soda and water to clean terminals periodically, then apply petroleum jelly to prevent oxidation.
2. Charge During Off-Season
If your mower sits idle during winter, connect the battery to a smart charger or maintainer. This keeps it fully charged without overcharging, preserving its health.
3. Store in a Cool, Dry Place
Avoid leaving the battery in extremely hot or humid environments. Heat accelerates chemical breakdown, shortening lifespan.
4. Check Voltage Regularly
Use a multimeter to ensure your battery stays above 12.4 volts. If it drops below 12V for an extended period, recharge immediately to avoid permanent damage.
5. Avoid Deep Discharges
Running the battery completely flat repeatedly can reduce capacity over time. Try to recharge before it drops too low.
Common Signs Your John Deere S120 Battery Needs Replacement
Your S120 battery won’t last forever, but it usually gives warning signs before failing completely. Watch for the following:
- Slow engine cranking or repeated clicking sounds
- Dim headlights or electrical components not functioning properly
- Frequent jump starts or rapid discharge after charging
- Corroded terminals or swollen casing
- Battery older than 3–4 years
If you notice any of these symptoms, it’s time to replace the battery before it leaves you stranded mid-mow.
Frequently Asked Questions (FAQs)
Q1: What size battery fits the John Deere S120?
The S120 typically uses a 12V U1R-size battery, rated between 300–350 CCA and around 35Ah. Always verify your model’s manual before buying.
Q2: How long should a John Deere S120 battery last?
With regular charging and proper storage, most high-quality AGM batteries last 3–5 years.
Q3: Can I use a car battery in my S120 mower?
No, car batteries are too large and not designed for the mower’s electrical system. Always use a U1R-size lawn and garden battery.
Q4: How can I extend the life of my battery?
Keep it clean, fully charged during storage, and avoid deep discharges. Using a maintainer during the offseason is also recommended.
Q5: Should I disconnect the battery during winter?
Yes, if you’re not using your mower for several months, disconnect the battery and store it indoors with a maintainer connected.
Final Verdict: Choosing the Best Battery for Your John Deere S120
The John Deere S120 is a dependable lawn tractor that deserves an equally dependable power source. Among the top options, the ExpertPower 12V 35Ah and Mighty Max ML-U1-35 stand out for their reliability, performance, and maintenance-free design. However, the Weize 12V 35Ah offers the best budget-friendly balance without sacrificing power.
